Configure DNS in Linux VMs using BIND9 service
Overview
Each and every device in computer network require an IP address for communication. Imagine the tediousness of typing IP addresses for connecting to servers hosting the websites.
Glad that we do not have to do that because of DNS.
DNS (Domain Name System) is used to resolve (translate) domain names to IP addresses and vice versa. A DNS server, also known as a nameserver, maps IP addresses to hostnames or domain names.
BIND (Berkley Internet Naming Daemon) is an open source software package for implementing DNS servers for a number of Linux and Unix based operating systems.
In this blog, we will deploy an Azure Virtual Machine with Ubuntu 22.04 LTS and configure DNS using BIND9.
DNS configuration scenarios with BIND9
Before we proceed with configuration of DNS server using BIND9, we need to understand the different types of DNS servers. We will focus on caching nameserver and authoratative nameserver.
A caching nameserver does not host any domain but it will recursively resolve the DNS name queries and remember the answer when the domain is queried again.
An authoratative nameserver contains a zone file and is authoritative for that zone. Hence, DNS name queries are answered by the authoratative nameserver itself.
We will configure BIND9 as both caching and authoratative nameserver.
Prerequisites
Since we will be deploying resouces in Azure in this blog, we will need an Azure subscription.
Network Architecture
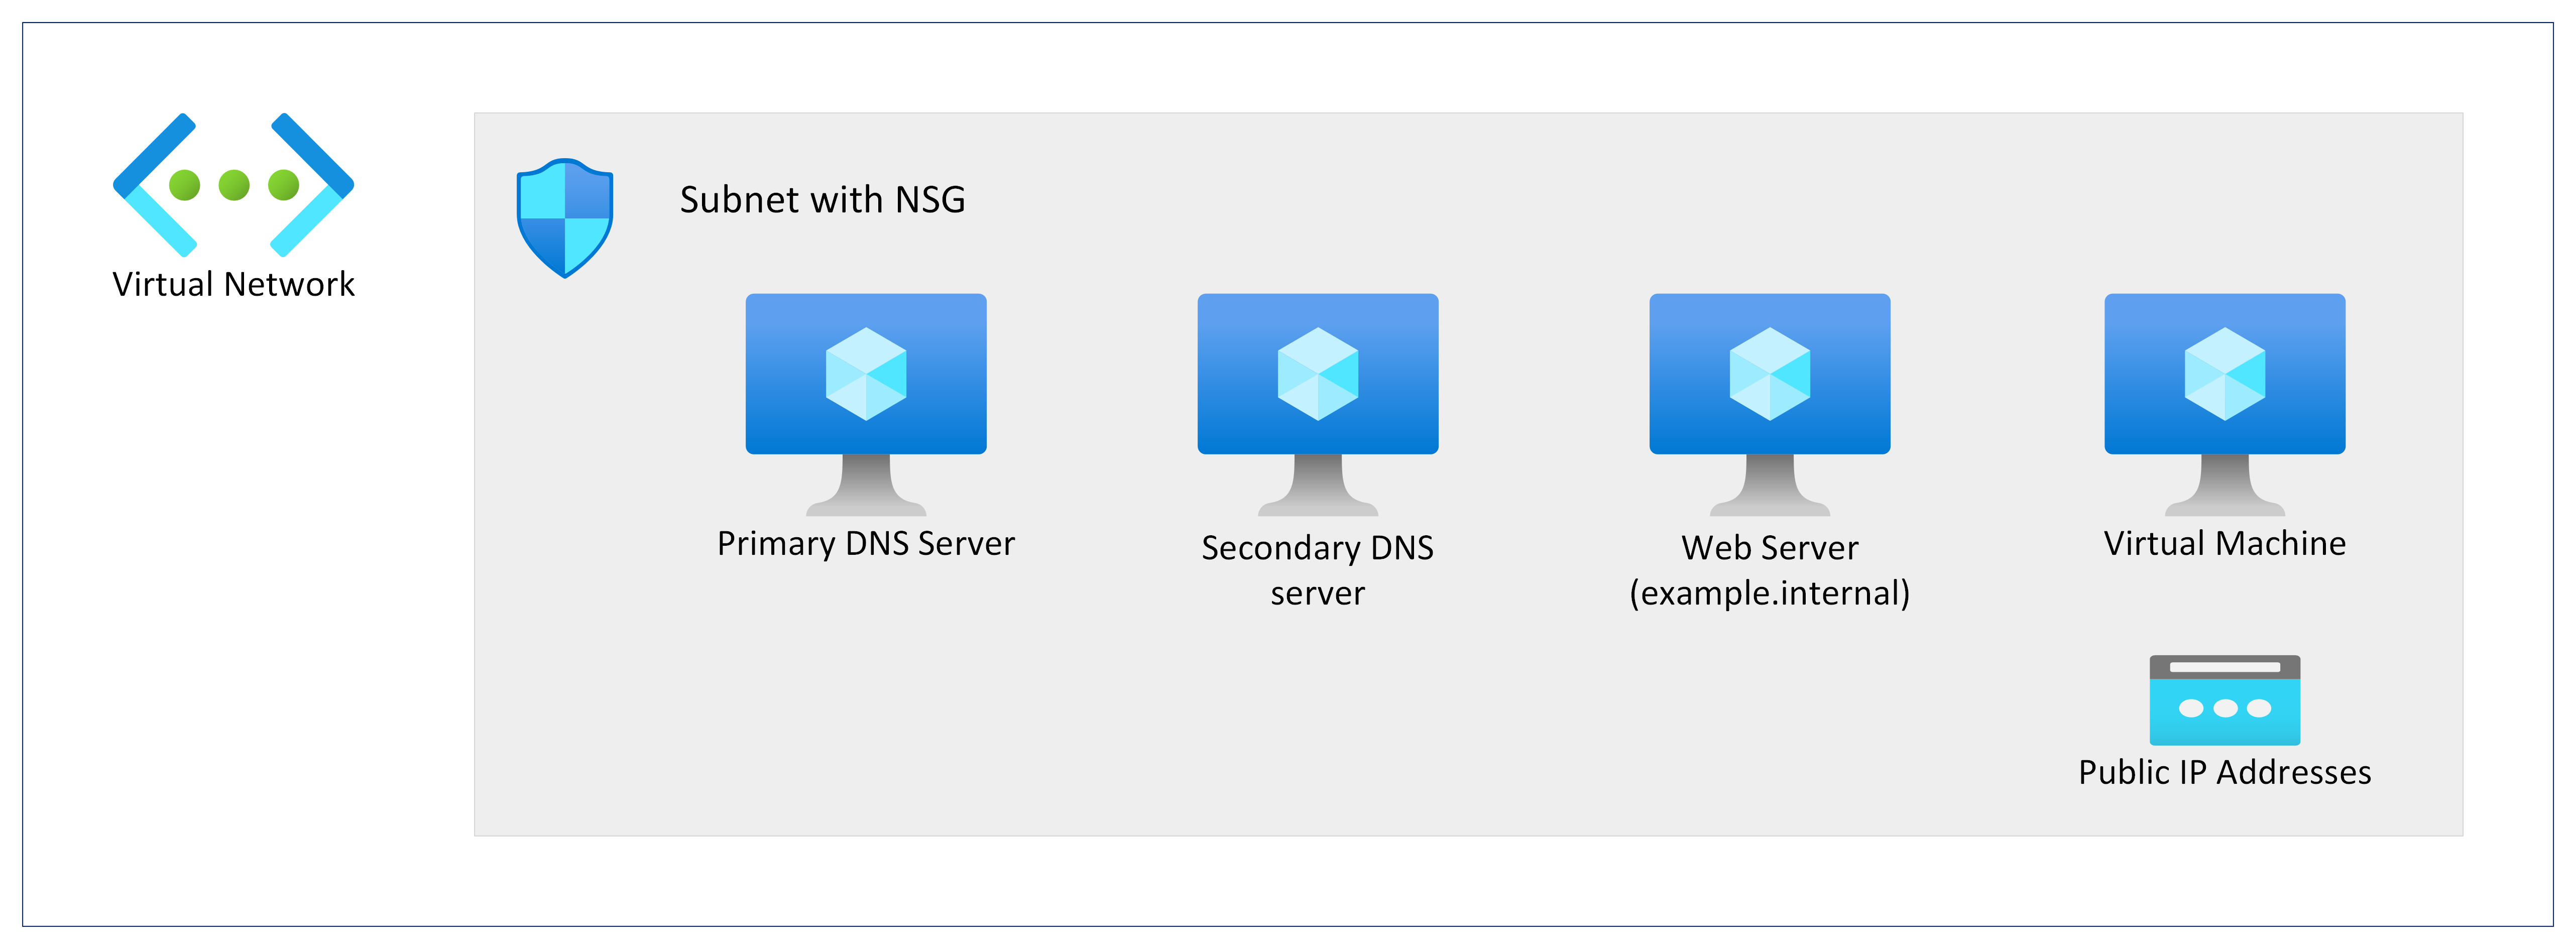
We will deploy a Virtual Network consisting of two Virtual Machines as DNS servers.
These primary and secondary DNS servers will host an internal DNS zone “example.internal” and will also act as name caching servers for all other domains.
We also have another VM configured as web server which we will try to access from another VM within the VNet using FQDN “example.internal”.
Configure DNS server using BIND9
Install BIND9 service
BIND9 is available in the Main repository. No additional repository needs to be enabled for BIND9. Execute the following command to install the bind9 package.
sudo apt-get update
sudo apt-get install bind9
You could optionally install the BIND9 documentation (very useful).
sudo apt-get install bind9-doc
It is a best practice to install bind9utils package for verifying configuration of BIND9. This package provides number utilities like named-checkconf and named-checkzone which would indicate any errors in the configuration.
sudo apt-get install bind9-utils
You may also want to install dnsutils package for DNS utilities like dig or nslookup.
sudo apt-get install dnsutils
Example:

Configure Azure VMs with Ubuntu OS as caching nameserver using BIND9
The default configuration of BIND9 acts as a caching server. We need to edit the /etc/bind/named.conf.options file using editors like vi, nano, code, etc. to set the IP addresses of Azure recursive resolver.
sudo vi /etc/bind/named.conf.options
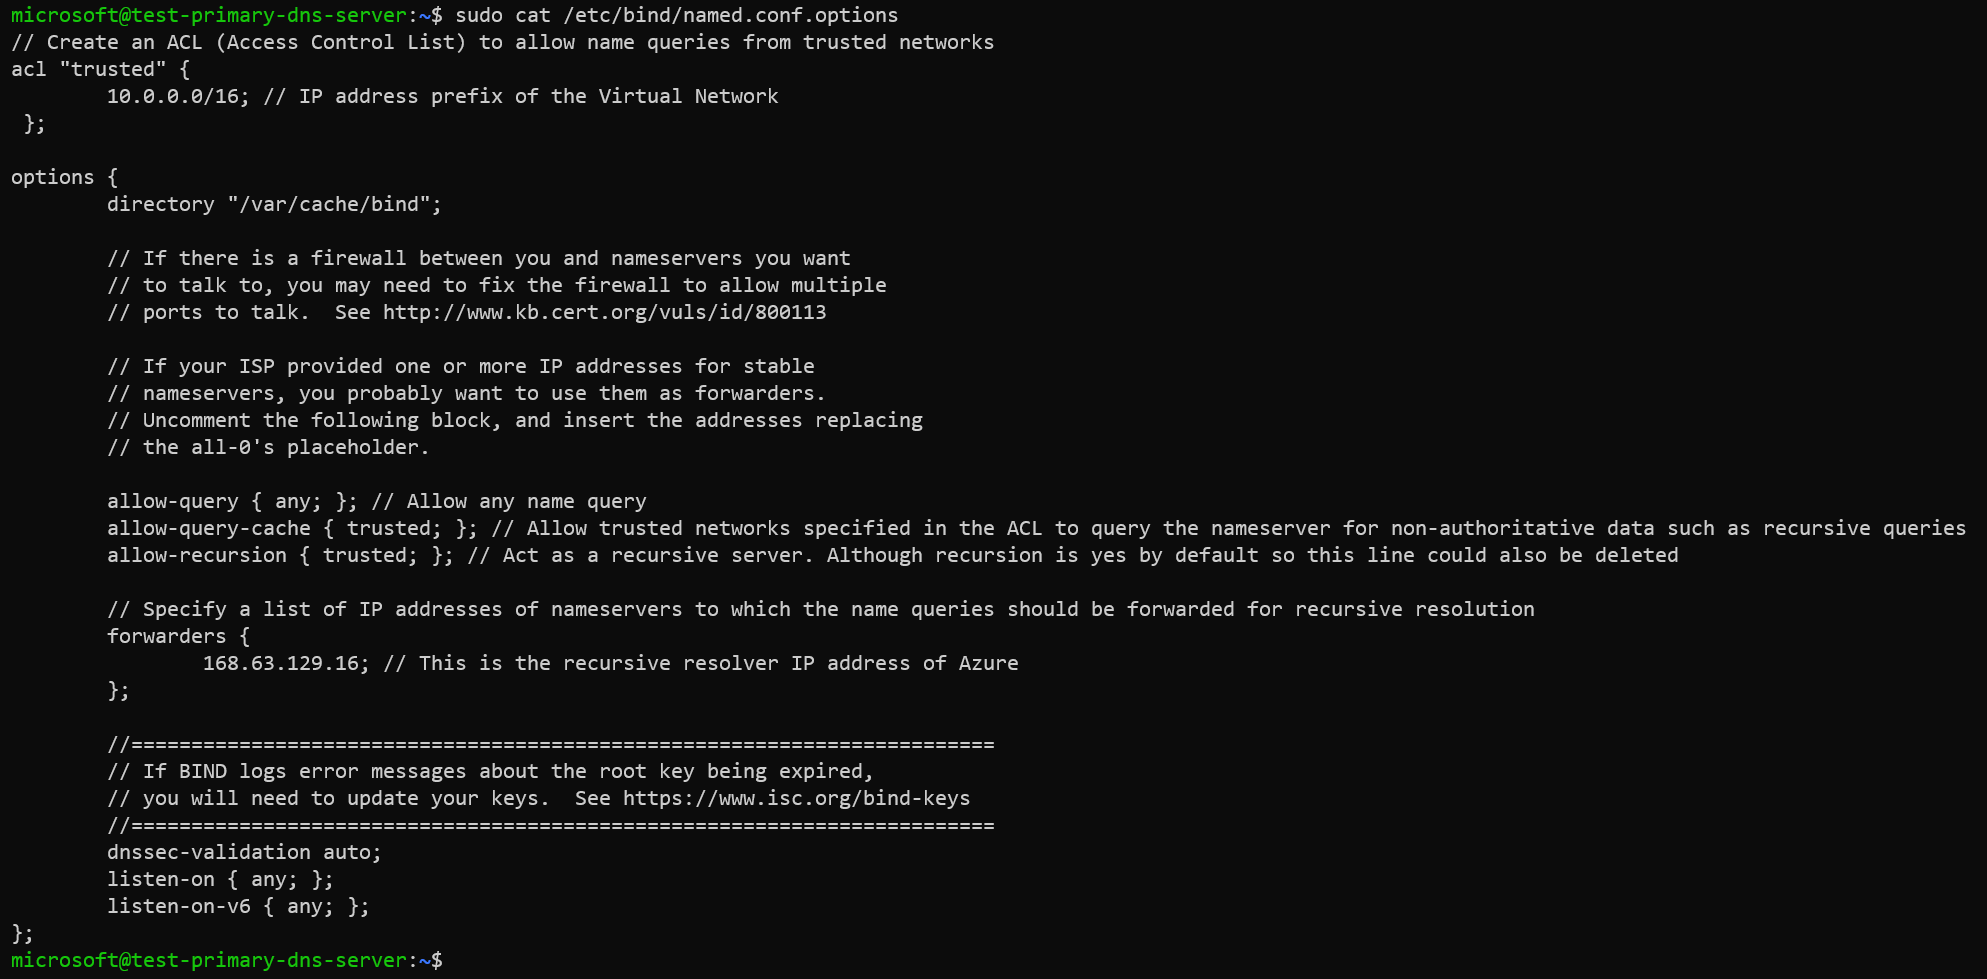
Contents of the /etc/bind/named.conf.options file.
// Create an ACL (Access Control List) to allow name queries from trusted networks
acl "trusted" {
        10.0.0.0/16; // IP address prefix of the Virtual Network
 };

options {
        directory "/var/cache/bind";

        // If there is a firewall between you and nameservers you want
        // to talk to, you may need to fix the firewall to allow multiple
        // ports to talk.  See http://www.kb.cert.org/vuls/id/800113

        // If your ISP provided one or more IP addresses for stable
        // nameservers, you probably want to use them as forwarders.
        // Uncomment the following block, and insert the addresses replacing
        // the all-0's placeholder.

        allow-query { any; }; // Allow any name query
        allow-query-cache { trusted; }; // Allow trusted networks specified in the ACL to query the nameserver for non-authoritative data such as recursive queries
        allow-recursion { trusted; }; // Act as a recursive server. Although recursion is yes by default so this line could also be deleted

        // Specify a list of IP addresses of nameservers to which the name queries should be forwarded for recursive resolution
        forwarders {
                168.63.129.16; // This is the recursive resolver IP address of Azure
        };

        //========================================================================
        // If BIND logs error messages about the root key being expired,
        // you will need to update your keys.  See https://www.isc.org/bind-keys
        //========================================================================
        dnssec-validation auto;
        listen-on { any; };
        listen-on-v6 { any; };
};
Example:
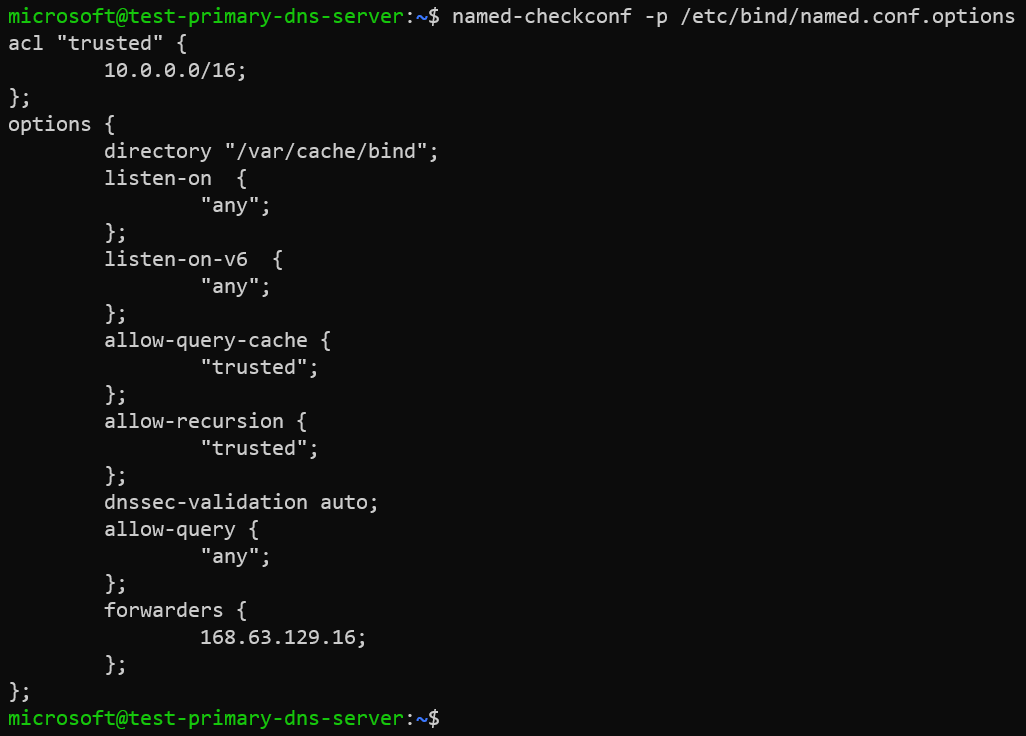
If the bind9utils was installed in previous step, then we could verify if our configuration of /etc/bind/named.conf.options has any errors by executing named-checkconf command.
named-checkconf -p /etc/bind/named.conf.options
The -p option prints the configuration if no errors were detected.
Example:
Configure Azure VMs with Ubuntu OS as authoritative nameserver using BIND9
Configuring primary nameserver
Authoritative nameservers host one or more DNS zones and provide authoritative answers to name queries for those zones. For high availability of DNS, we configure Azure VMs as primay and secondary DNS servers. A primary zone reads its zone data directly from a file system. A secondary zone obtains its zone data from the primary zone using a process called zone transfer.
Configuring Forward Zone
We will create a forward zone file for our custom domain example.internal. We will use an existing zone file /etc/bind/db.local as a template to create our own zone file /etc/bind/zone.example.internal.
sudo cp /etc/bind/db.local /etc/bind/zone.example.internal
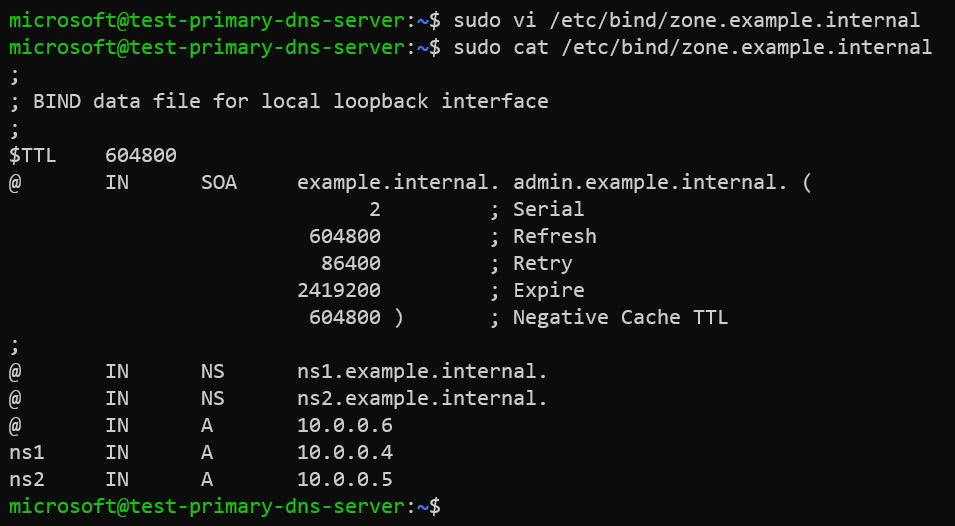
We will now edit our zone file /etc/bind/zone.example.internal with our custom domain example.internal and records.
sudo vi /etc/bind/zone.example.internal
Contents of the zone file /etc/bind/zone.example.internal.
;
; BIND data file for local loopback interface
;
$TTL    604800
@       IN      SOA     example.internal. admin.example.internal. (
                              2         ; Serial
                         604800         ; Refresh
                          86400         ; Retry
                        2419200         ; Expire
                         604800 )       ; Negative Cache TTL
;
@       IN      NS      ns1.example.internal.
@       IN      NS      ns2.example.internal.
@       IN      A       10.0.0.6
ns1     IN      A       10.0.0.4
ns2     IN      A       10.0.0.5
Example:
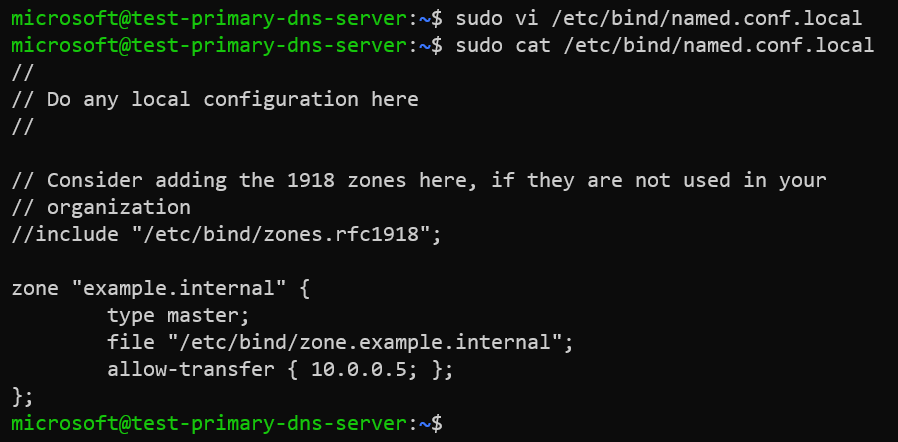
We will edit the /etc/bind/named.conf.local file to add our DNS zone example.internal to BIND9.
sudo vi /etc/bind/named.conf.local
Contents of the zone file /etc/bind/named.conf.local.
zone "example.internal" {
        type master;
        file "/etc/bind/zone.example.internal";
        allow-transfer { 10.0.0.5; };
};
Example:
Configuring Reverse Zone
Now that we have created forward zone for resolving our custom domain example.internal to IP address, we could create a reverse zone for resolving IP address to our custom domain example.internal.
The name of an IPv4 reverse lookup zone is based on the IP range that it represents. It should be in the following format <IPv4 prefix in reverse order>.in-addr.arpa.
In our example, the IP prefix of Virtual Network is 10.0.0.0/16, so we can name our reverse lookup zone as 0.0.10.in-addr.arpa.
Please note that for IP prefix length smaller than /24 create reverse lookup zone named as <last octet>-<prefix length>.<first three octets of IPv4 prefix in reverse order>.in-addr.arpa. For example, for the IP range of 192.0.2.128/26, use 128-26.2.0.192.in-addr.arpa as the reverse zone name.
We will now create a reverse zone file /etc/bind/0.0.10.in-addr.arpa using an existing reverse zone file /etc/bind/db.127 as a template.
sudo cp /etc/bind/db.127 /etc/bind/0.0.10.in-addr.arpa
Contents of the zone file /etc/bind/0.0.10.in-addr.arpa.
;
; BIND reverse data file for local loopback interface
;
$ORIGIN 0.0.10.in-addr.arpa.
$TTL    604800
@       IN      SOA     example.internal. admin.example.internal. (
                              1         ; Serial
                         604800         ; Refresh
                          86400         ; Retry
                        2419200         ; Expire
                         604800 )       ; Negative Cache TTL
;
@       IN      NS      ns1.example.internal.
@       IN      NS      ns2.example.internal.
6       IN      PTR     example.internal.
Example:

We will edit the /etc/bind/named.conf.local file to add our reverse zone /etc/bind/0.0.10.in-addr.arpa to BIND9.
sudo vi /etc/bind/named.conf.local
Contents of the zone file /etc/bind/named.conf.local.
zone "example.internal" {
        type master;
        file "/etc/bind/zone.example.internal";
        allow-transfer { 10.0.0.5; };
        also-notify { 10.0.0.5; };
};
zone "0.0.10.in-addr.arpa" {
        type master;
        file "/etc/bind/0.0.10.in-addr.arpa";
        allow-transfer { 10.0.0.5; };
        also-notify { 10.0.0.5; };
};
Example:

Verify zone files
We could verify if the configuration of our forward and reverse zone files are correct using the named-checkzone utility before restarting BIND9 and making the changes live.
Verify forward zone file.
named-checkzone example.internal /etc/bind/zone.example.internal
If everything is configured correctly then the output should be similar to:

Verify reverse zone file.
named-checkzone 0.0.10.in-addr.arpa /etc/bind/0.0.10.in-addr.arpa
The output should be similar to:

Restart BIND9 service
Once you have made changes to the zone files BIND9 needs to be restarted for the changes to take effect.
sudo systemctl restart bind9.service
Configuring secondary nameserver
A secondary nameserver is needed in order to maintain the availability of the domain should the Primary become unavailable.
Before we configure our secondary nameserver, we must allow zone transfer on the primary master server by adding add the allow-transfer option to the sample Forward and Reverse zone definition in /etc/bind/named.conf.local. We will also have our primary nameserver notifying secondary nameserver of zone changes by adding also-notify { ipaddress; }; in configuration file /etc/bind/named.conf.local.
In primary nameserver:
zone "<zone name>" {
        type master;
        file "<zone file>";
        allow-transfer { <IP address of secondary nameserver>; };
        also-notify { <IP address of secondary nameserver>; };
};
We have already configured our primary nameserver as above so we will now proceed with configuration of secondary nameserver.
Please install BIND9 in secondary nameserver by executing sudo apt-get update && sudo apt-get install bind9 command if not already done.
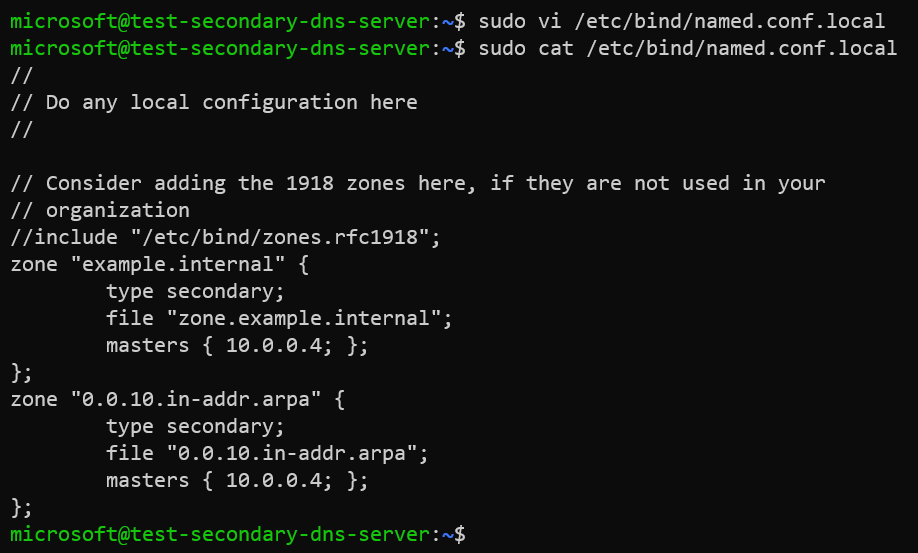
We will edit the configuration file /etc/bind/named.conf.local and add following declarations for the Forward and Reverse zones.
sudo vi /etc/bind/named.conf.local
Contents of the zone file /etc/bind/named.conf.local.
zone "example.internal" {
        type secondary;
        file "zone.example.internal";
        masters { 10.0.0.4; };
};
zone "0.0.10.in-addr.arpa" {
        type secondary;
        file "0.0.10.in-addr.arpa";
        masters { 10.0.0.4; };
};
Example:
Restart the BIND9 service by executing sudo systemctl restart bind9.service command.
Configure custom DNS servers in Azure Virtual Network
Now that we have configured both primary and secondary nameservers, we need to specify IP addresses of these VMs as DNS servers in our Virtual Network.
The default DNS server provided by Azure is 168.63.129.16. Since we want to use our own DNS servers, we could specify the private IP addresses of our primary and secondary DNS servers in DNS settings of the Virtual Network.
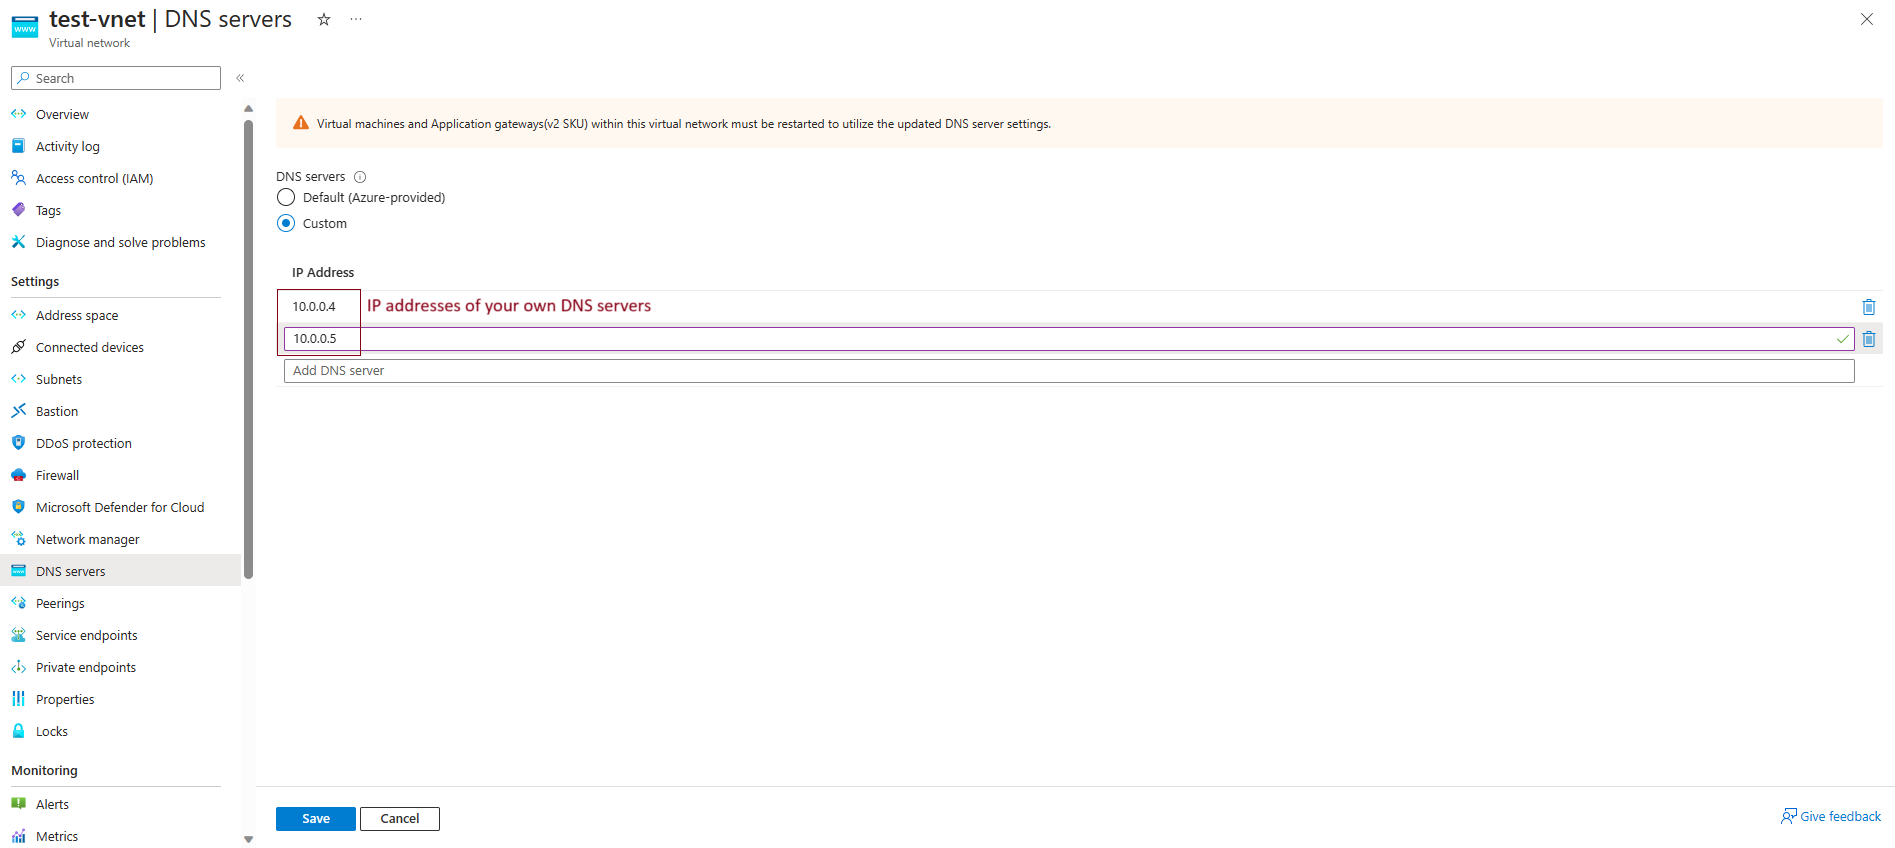
Please note that you need to restart all other VMs after changing DNS servers in VNet so that the IP addresses of the DNS servers are propagared.
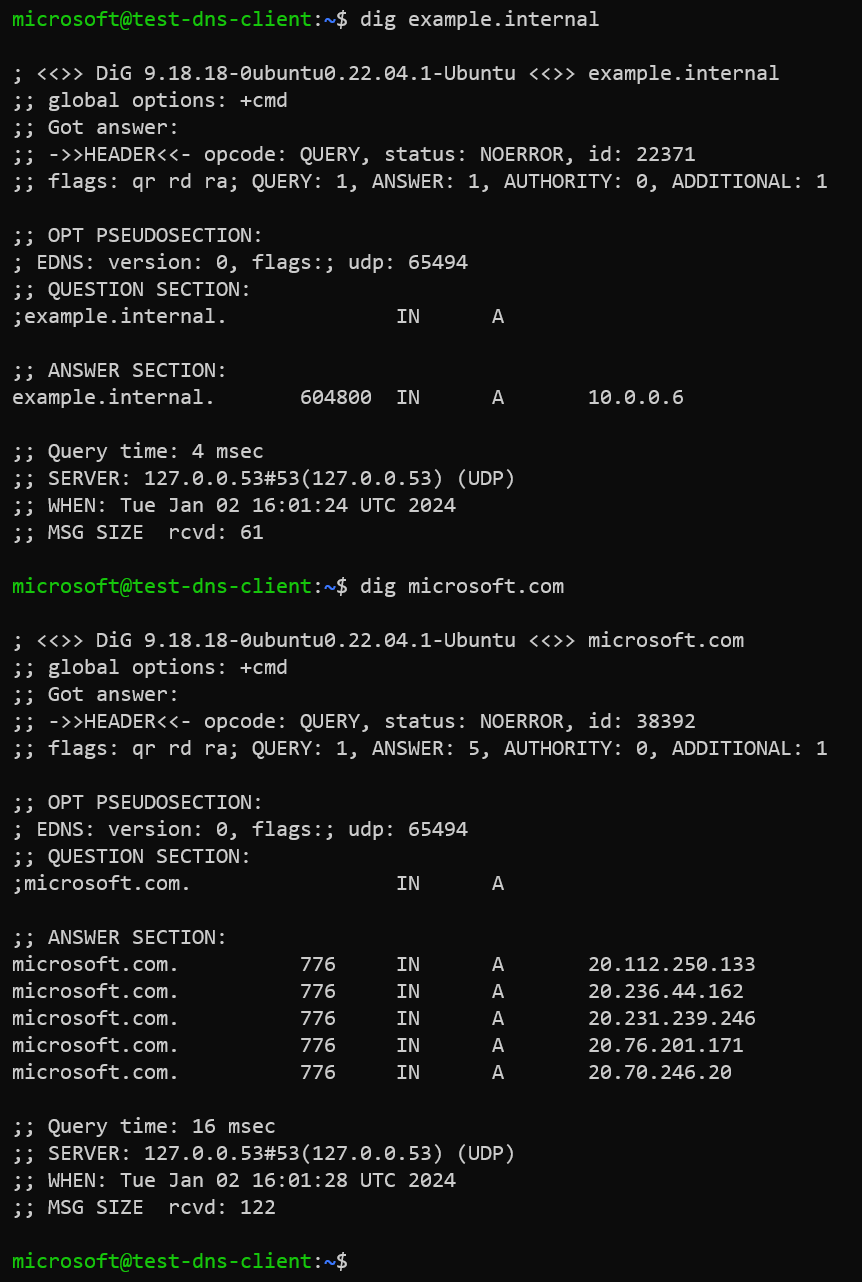
Verify DNS resolution
Execute dig or nslookup command to verify the name resolution of our custom domain example.internal.
Dig output:
Packet capture:
