Configure Linux VM as a web server using Nginx
Overview
Nginx is an open source software for web serving, reverse proxying, caching, load balancing, media streaming, and more.
In this blog, we will configure an Azure VM with Ubuntu OS as a web server using Nginx.
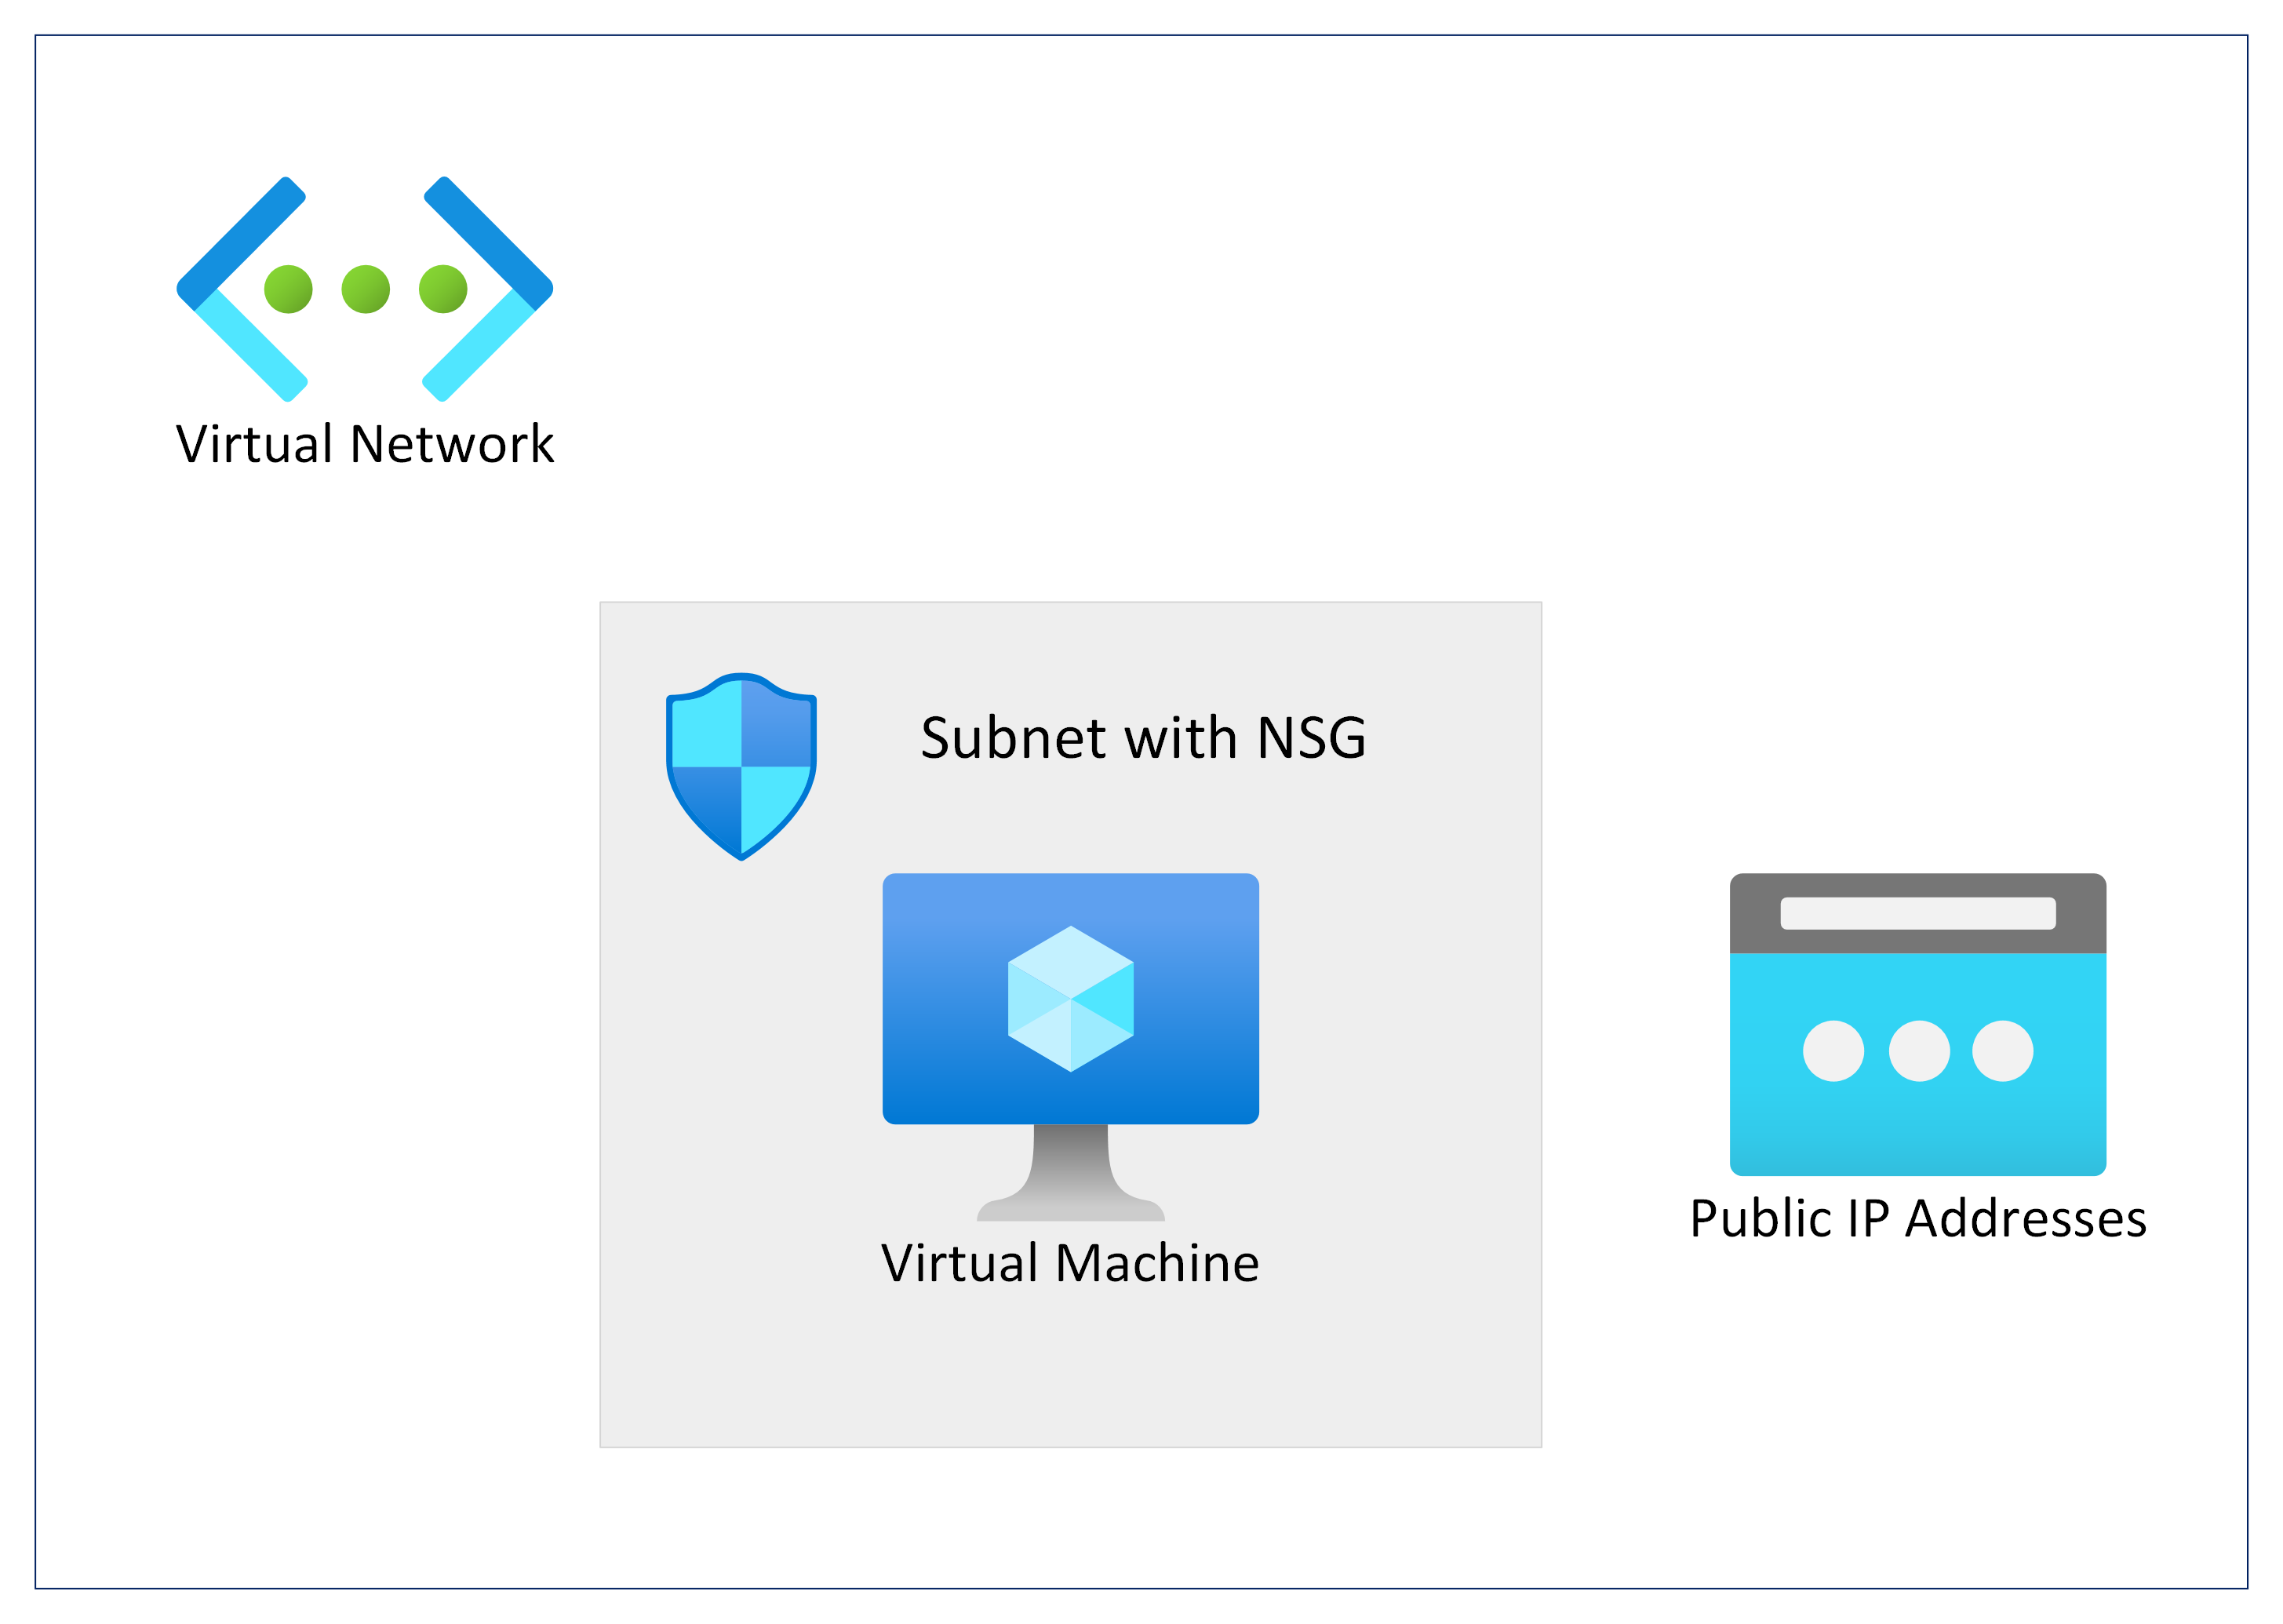
Network Architecture
We will deploy an Azure Virtual Machine with Ubuntu OS for configuring Nginx as web service.
Configure web service using Nginx
-
Install Nginx package.
sudo apt-get update sudo apt-get install nginx -
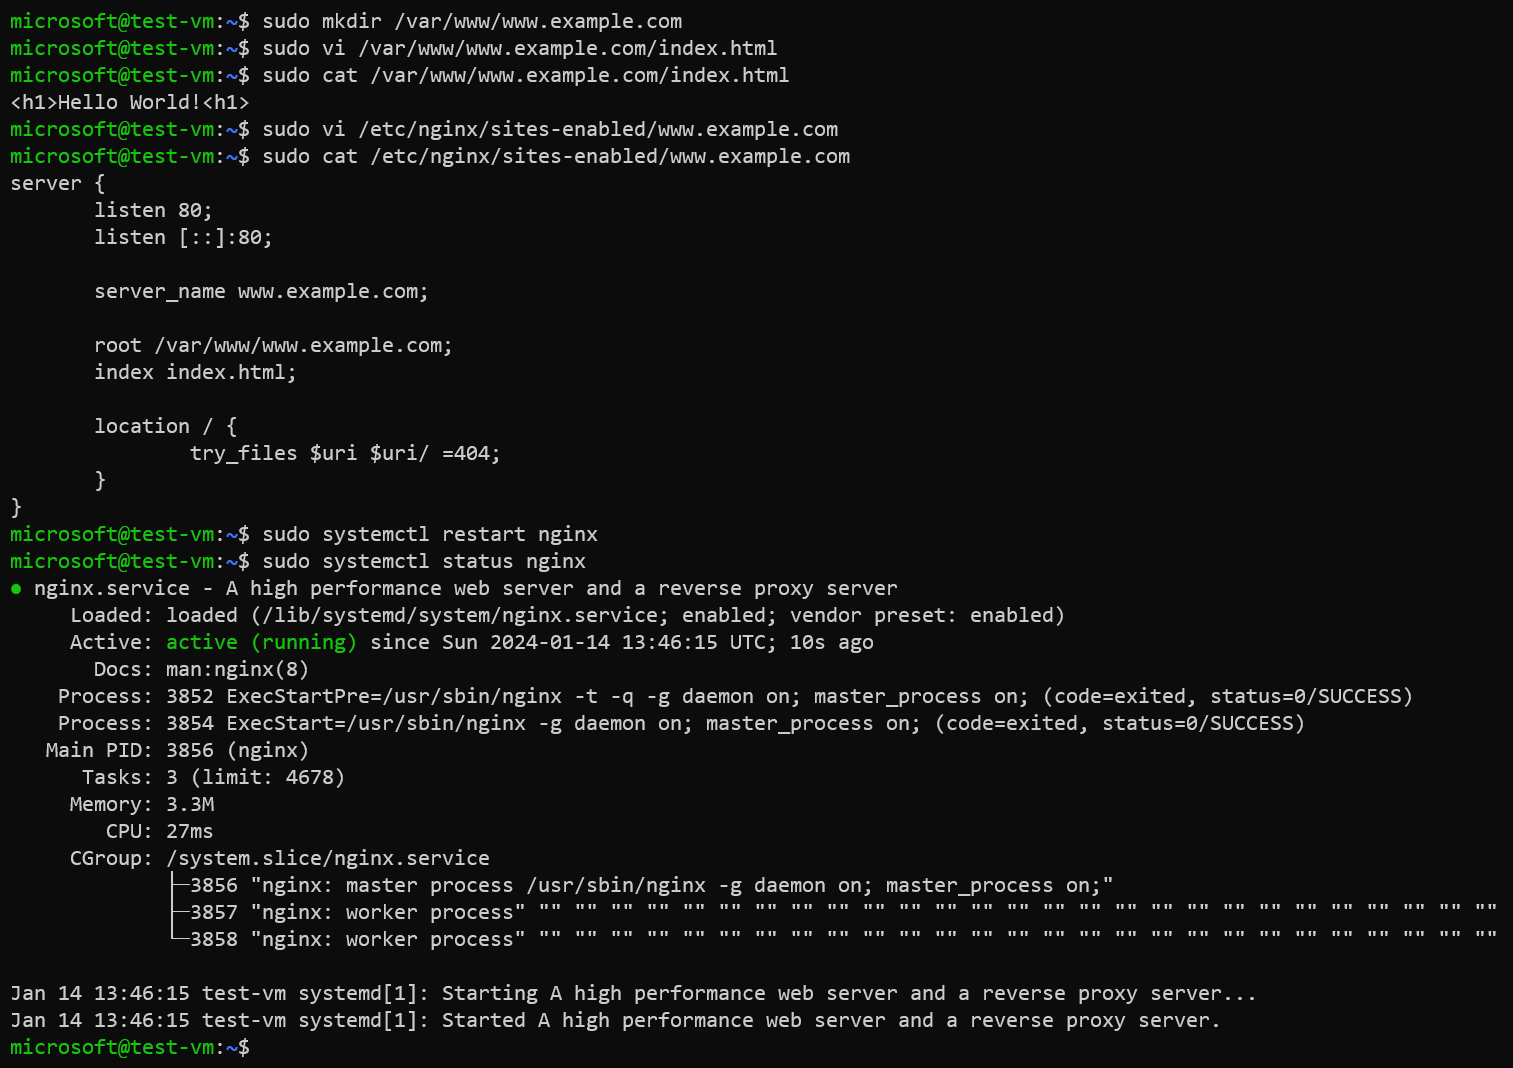
Create directory for custom website.
sudo mkdir /var/www/www.example.com -
Create a landing webpage.
sudo vi /var/www/www.example.com/index.htmlExample of the landing page.
<h1>Hello World!<h1> -
Create a virtual host file for your website.
sudo vi /etc/nginx/sites-enabled/www.example.comConfiguration of virtual host file:
server { listen 80; listen [::]:80; server_name www.example.com; root /var/www/www.example.com; index index.html; location / { try_files $uri $uri/ =404; } } -
Restart Nginx service.
sudo systemctl restart nginxExample:
-
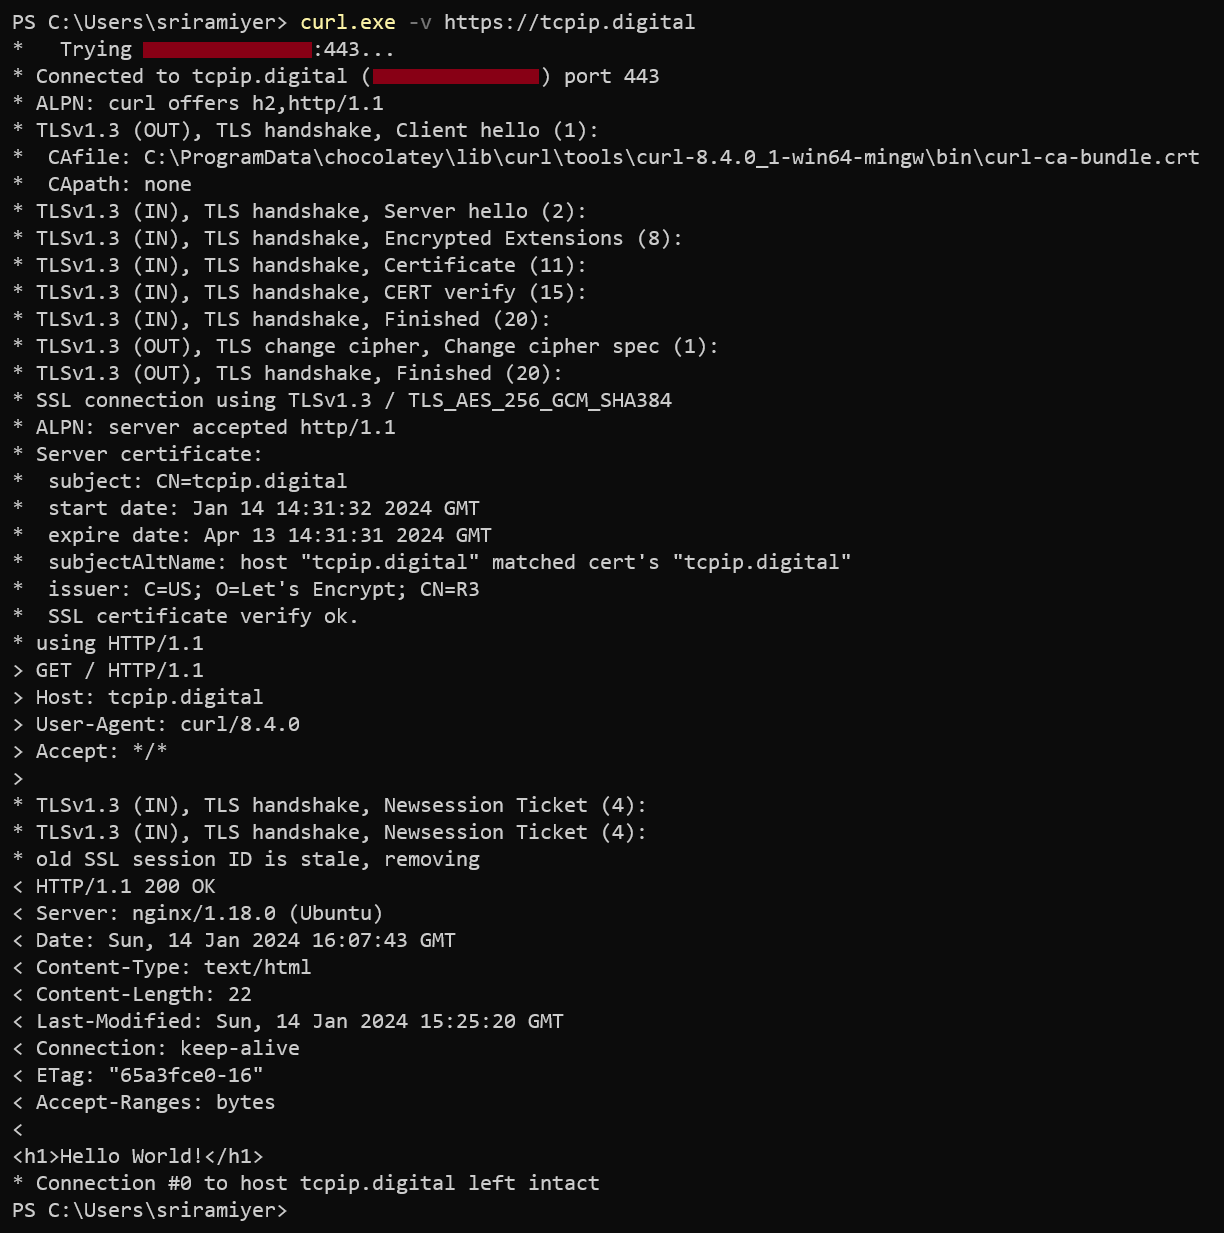
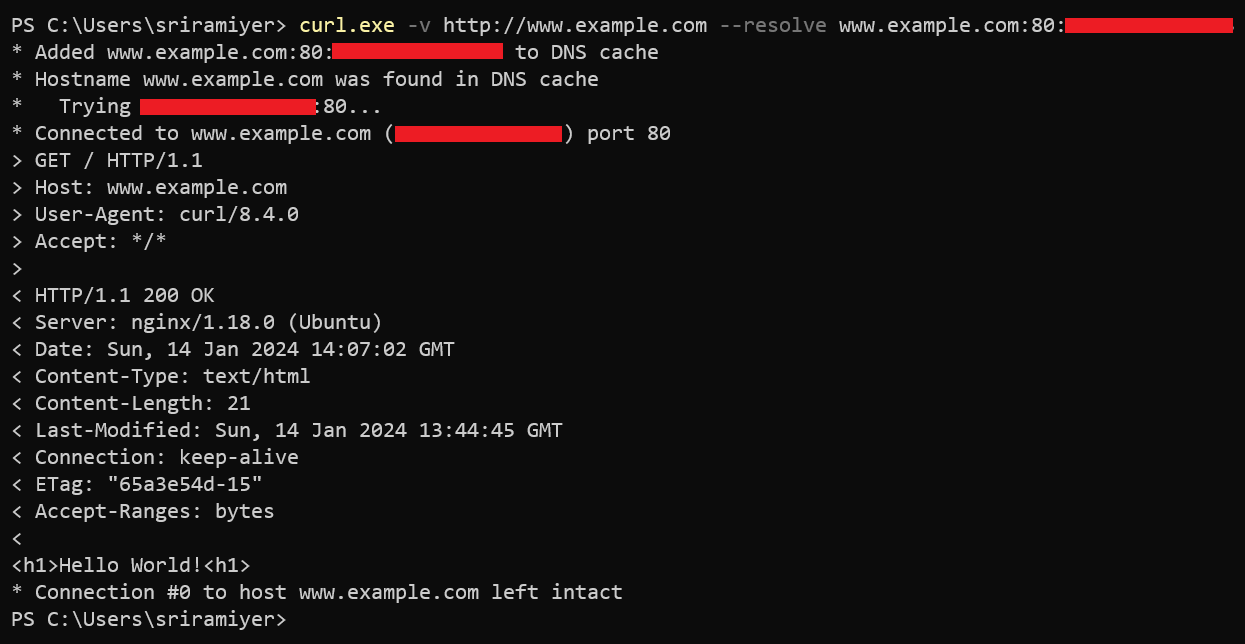
Verify accessing the web site.
curl -v http://www.example.com --resolve www.example.com:80:<Public IP of the VM>Example:
Securing web service using TLS/SSL certificates
In the previous sections, we configured Nginx as a web service using HTTP protocol. In order to encrypt the traffic, we need to create TLS/SSL certificate and configure Nginx to use the certificate for enabling HTTPS.
We could either create a self-signed certificate or issue a trusted CA (Certificate Authority) certificate.
Please note that self-signed certificates are not recommended for production or in customer/public facing websites because the custom domain for which the certificate is issued is not verified.
When a truested CA certificate is issued, the custom domain in verified by a third-party CA and is more secure.
Generate a self-signed certificate and update Nginx configuration
In this section, we will create a self-signed SSL certificate and .pfx file using the OpenSSL commands and configure them in Nginx.
Self-signed certificates are digital certificates that are not signed by a trusted third-party CA. Self-signed certificates are created, issued, and signed by the company or developer who is responsible for the website or software being signed. This is why self-signed certificates are considered unsafe for public-facing websites and applications.
Since we will create self-signed SSL certificate with custom root CA using OpenSSL commands, we need to install OpenSSL package.
sudo apt-get update
sudo apt-get install openssl
We will create a self-signed certificate chain with own custom root CA.
-
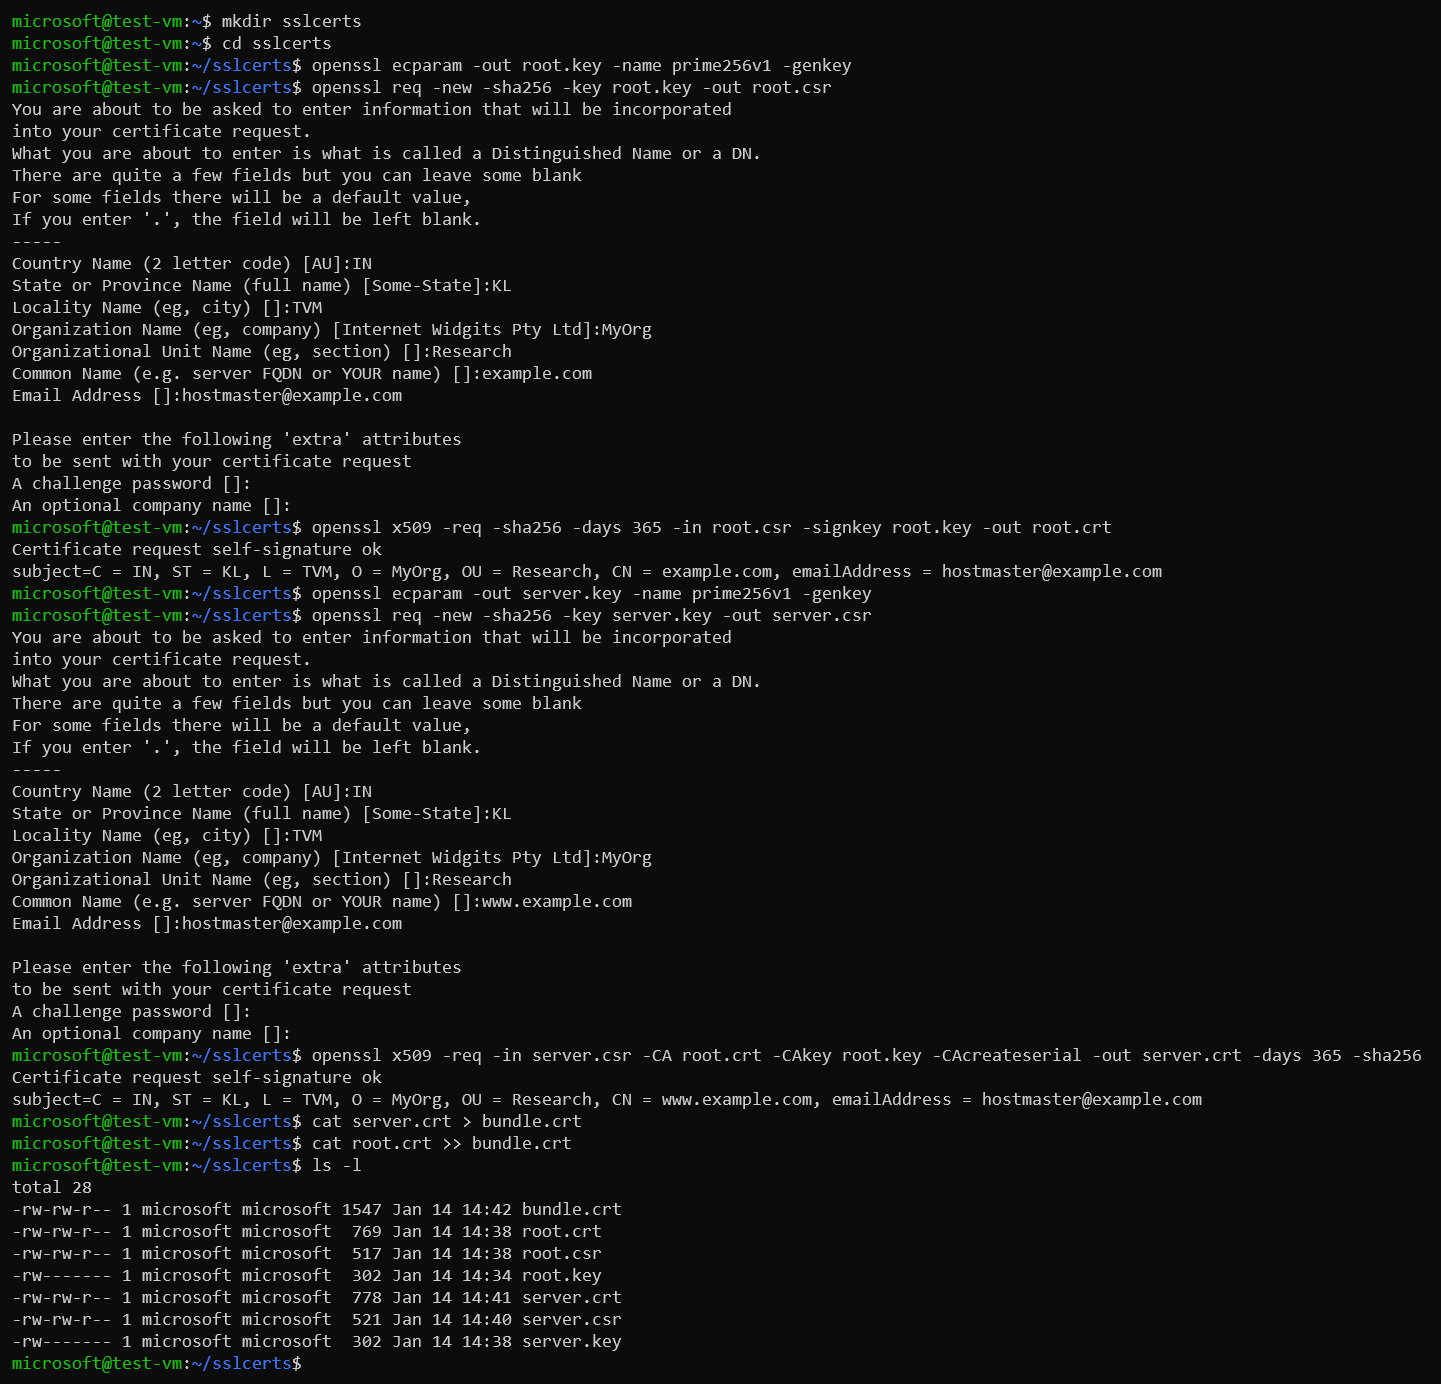
Create a key for root certificate
openssl ecparam -out root.key -name prime256v1 -genkey -
Create a CSR (Certificate Signing Request) for root certificate and self-sign it
Generate the Certificate Signing Request (CSR). The CSR is a public key that is given to a CA when requesting a certificate. The CA issues the certificate for this specific request.
We will be prompted for the password for the root key, and the organizational information for the custom CA such as Country/Region, State, Org, OU, and the fully qualified domain name (this is the domain of the issuer).
openssl req -new -sha256 -key root.key -out root.csr -
Create the root certificate using the root CSR. We will use this to sign your server certificate.
openssl x509 -req -sha256 -days 365 -in root.csr -signkey root.key -out root.crt -
Generate the key for the server certificate.
openssl ecparam -out server.key -name prime256v1 -genkey -
Create the CSR for server certificate.
Please note that the CN (Common Name) for the server certificate must be different from the issuer’s domain. For example, in this case, the CN for the issuer is
example.comand the server certificate’s CN iswww.example.com.openssl req -new -sha256 -key server.key -out server.csr -
Create the server certificate signing it using root key
openssl x509 -req -in server.csr -CA root.crt -CAkey root.key -CAcreateserial -out server.crt -days 365 -sha256 -
Create a full chain certificate bundling root and server certificates.
cat server.crt > bundle.crt
cat root.crt >> bundle.crt
Example:
-
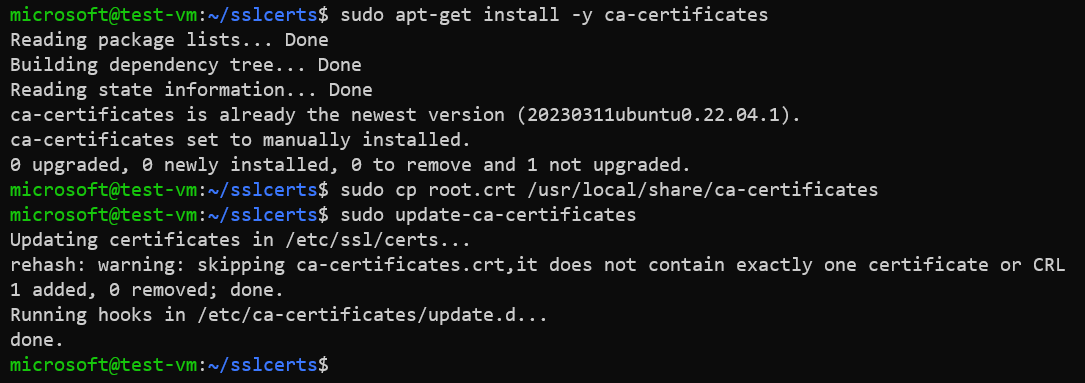
Install root certificate in the CA trust store of Ubuntu.
sudo apt-get install -y ca-certificates
sudo cp root.crt /usr/local/share/ca-certificates
sudo update-ca-certificates
Example:
Issue a trusted CA certificate using Let’s Encrypt
In this section, we will issue a trusted CA certificate using Let’s Encrypt. Let’s Encrypt is an open certificate authority (CA) which provides trusted CA certificate for free.
Please note that Let’s Encrypt or any CA would perform domain validation. Since
example.comis not a valid domain, this section requires that you have a valid domain. In this example,tcpip.digitaldomain is used and the Nginx is configured with a virtual host file fortcpip.digital.
-
Snap package manager is needed to install the Certbot tool so first install the snapd.
sudo apt-get install snapd sudo snap install snap-store -
Install Certbot in Ubuntu VM.
sudo snap install --classic certbot -
Configure the Certbot with Nginx and request SSL certificate from Let’s Encrypt.
sudo certbot --nginx -d example.comExample:

Generated certificate files coud be found at /etc/letsencrypt/live.
sudo ls -l /etc/letsencrypt/live/example.com
Let’s Encrypt will generate following files:
README			--> Contains information about generated certificate files by Let’s Encrypt
cert.pem		--> Contains leaf certificate generated by Let’s Encrypt for your domain
chain.pem		--> Contains intermediate and root certificates of Let’s Encrypt
fullchain.pem		--> Contains entire chain of leaf, intermediate and root certificates. This must be configured in your Nginx virtual host file
privkey.pem		--> Contains private key generated by Let’s Encrypt for your domain
Example:

You must use the “fullchain.pem” file as certificate for your Nginx server.
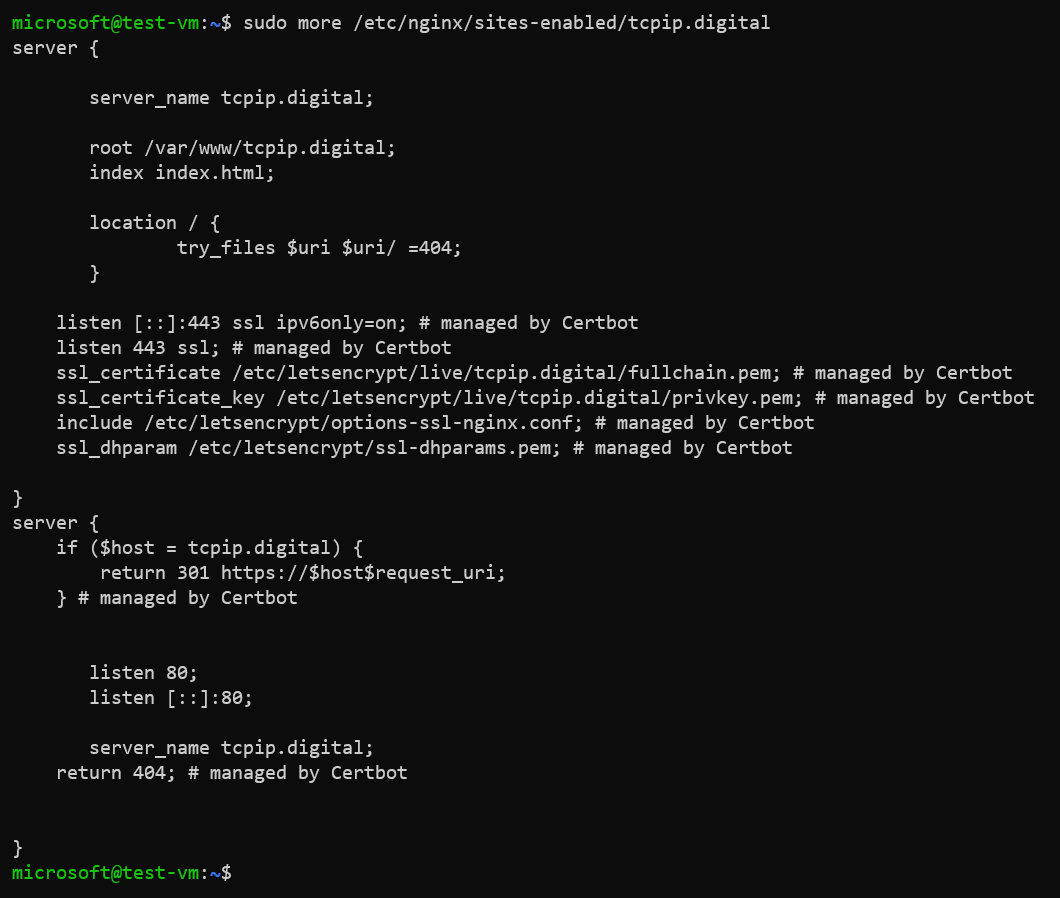
Please note that Certbot automatically configures the virtual host file of Nginx so that the web service uses HTTPS protocol and redirects HTTP requests to HTTPS.
Example:
Configure virtual host file of Nginx for HTTPS
In case you want to use self-signed certificate or the virtual host file is not managed by Certbot, you would need to update the virtual host file to use SSL certificate.
Configuration of virtual host file:
server {
       listen 443 ssl;
       listen [::]:443 ssl;

	   ssl on;
	   ssl_certificate /home/user/bundle.crt;
	   ssl_certificate_key /home/user/server.key;

       server_name www.example.com;
	   access_log /var/log/nginx/nginx.vhost.access.log;
	   error_log /var/log/nginx/nginx.vhost.error.log;

       root /var/www/www.example.com;
       index index.html;

       location / {
               try_files $uri $uri/ =404;
       }
}
The Nginx server will only respond to HTTPS requests on port 443 with the above configuration in virtual host file. It is good practice to also respond on port 80, even if you want to force all traffic to be encrypted by using permanent redirection from 80 (HTTP) to 443 (HTTPS).
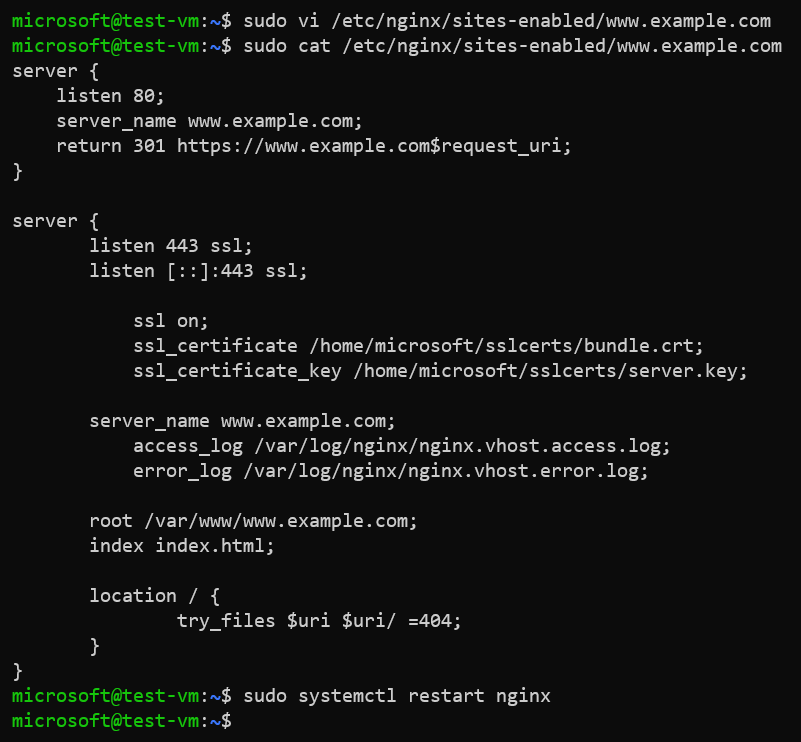
Configuration of virtual host file:
server {
    listen 80;
    server_name www.example.com;
    return 301 https://www.example.com$request_uri;
}

server {
       listen 443 ssl;
       listen [::]:443 ssl;

	   ssl on;
	   ssl_certificate /home/user/bundle.crt;
	   ssl_certificate_key /home/user/server.key;

       server_name www.example.com;
	   access_log /var/log/nginx/nginx.vhost.access.log;
	   error_log /var/log/nginx/nginx.vhost.error.log;

       root /var/www/www.example.com;
       index index.html;

       location / {
               try_files $uri $uri/ =404;
       }
}
Restart Nginx service: sudo systemctl restart nginx
Example:
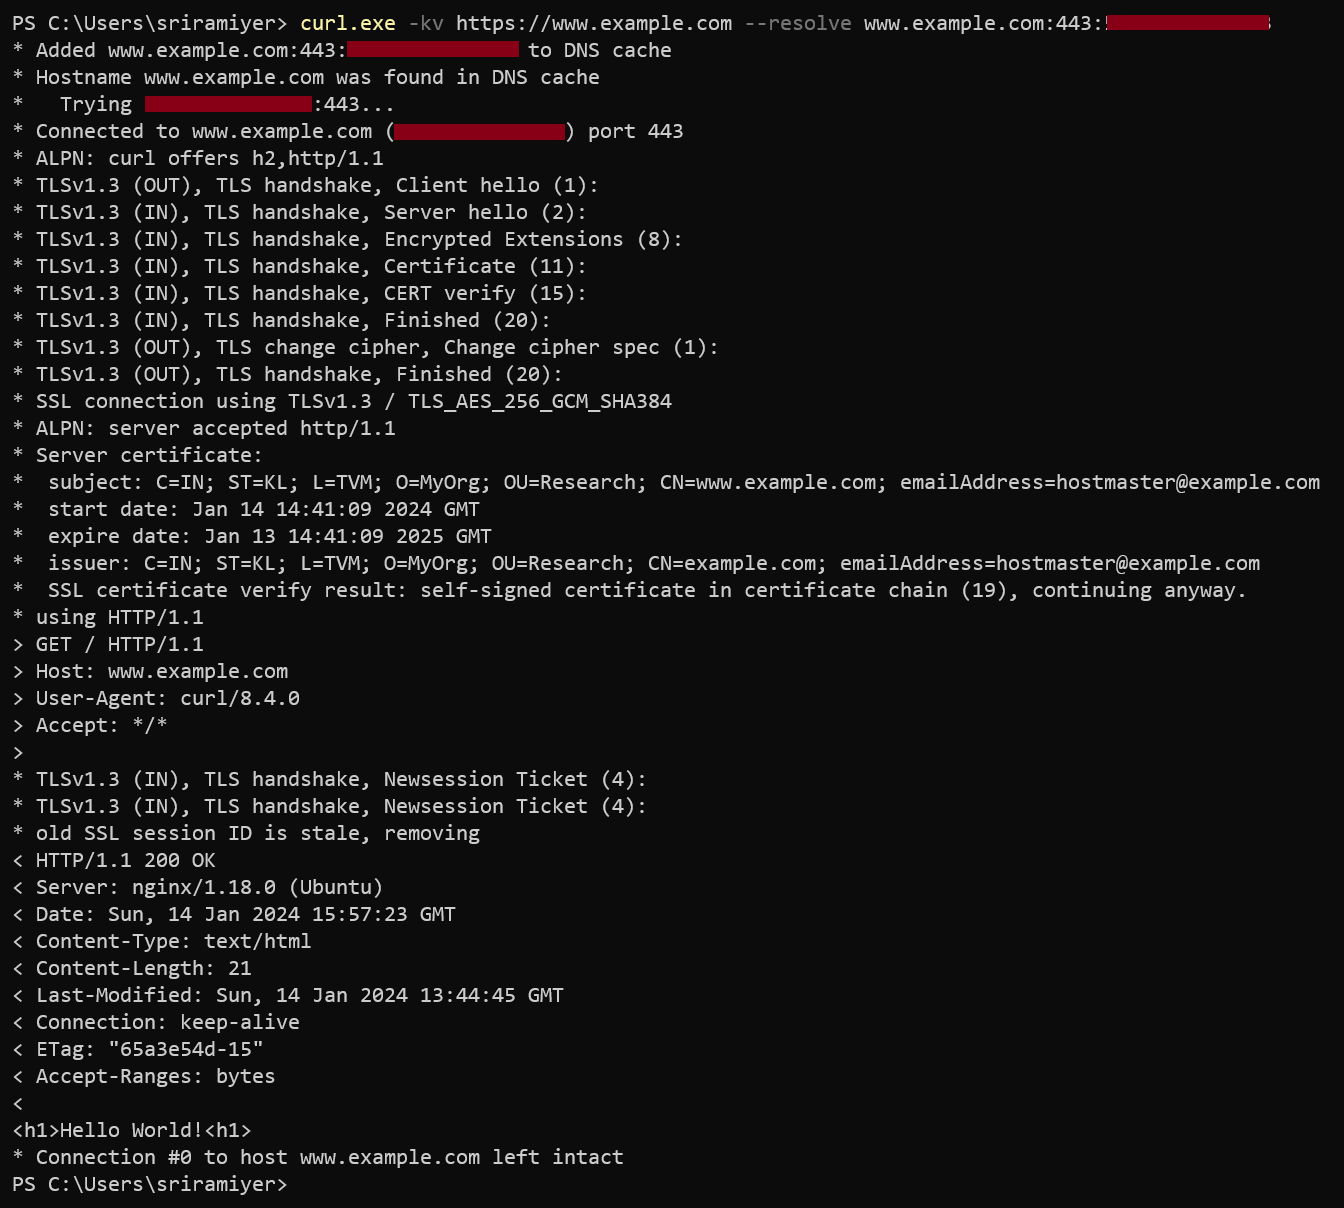
Verify accessing the Nginx
In case of using self-signed certificate, you would see “Not Secure” as the self-signed certificate is not secure unless the root certificate is stored in the trusted CA store of the client machine. When using curl command to access the web site over HTTPS, use -k option to proceed with TLS handshake even if not secure.
In case the trusted CA certificate is used, you could access the custom domain without using -k option.