Configure client authentication using Nginx
Overview
In a previous blog, we had deployed an Ubuntu VM in Azure and configured it as a web server using Nginx.
We also secured the web traffic by using SSL certificate.
For internal web-based applications, using SSL certificates for securing HTTPS communication in server side may not be sufficient. You would need to verify the client which is accessing the web service as well so that only authenticated clients could access it. This is called as client authentication or mutual TLS (mTLS).
We will configure Nginx so that our web server would authenticate client as well during TLS handshake in this blog.
Pre-requisites
This blog assumes that you already went through the previous blog and have basic knowledge of Nginx configuration as we would focus on configuring mTLS using Nginx and would touch suface of basic Nginx cofnigration for web server.
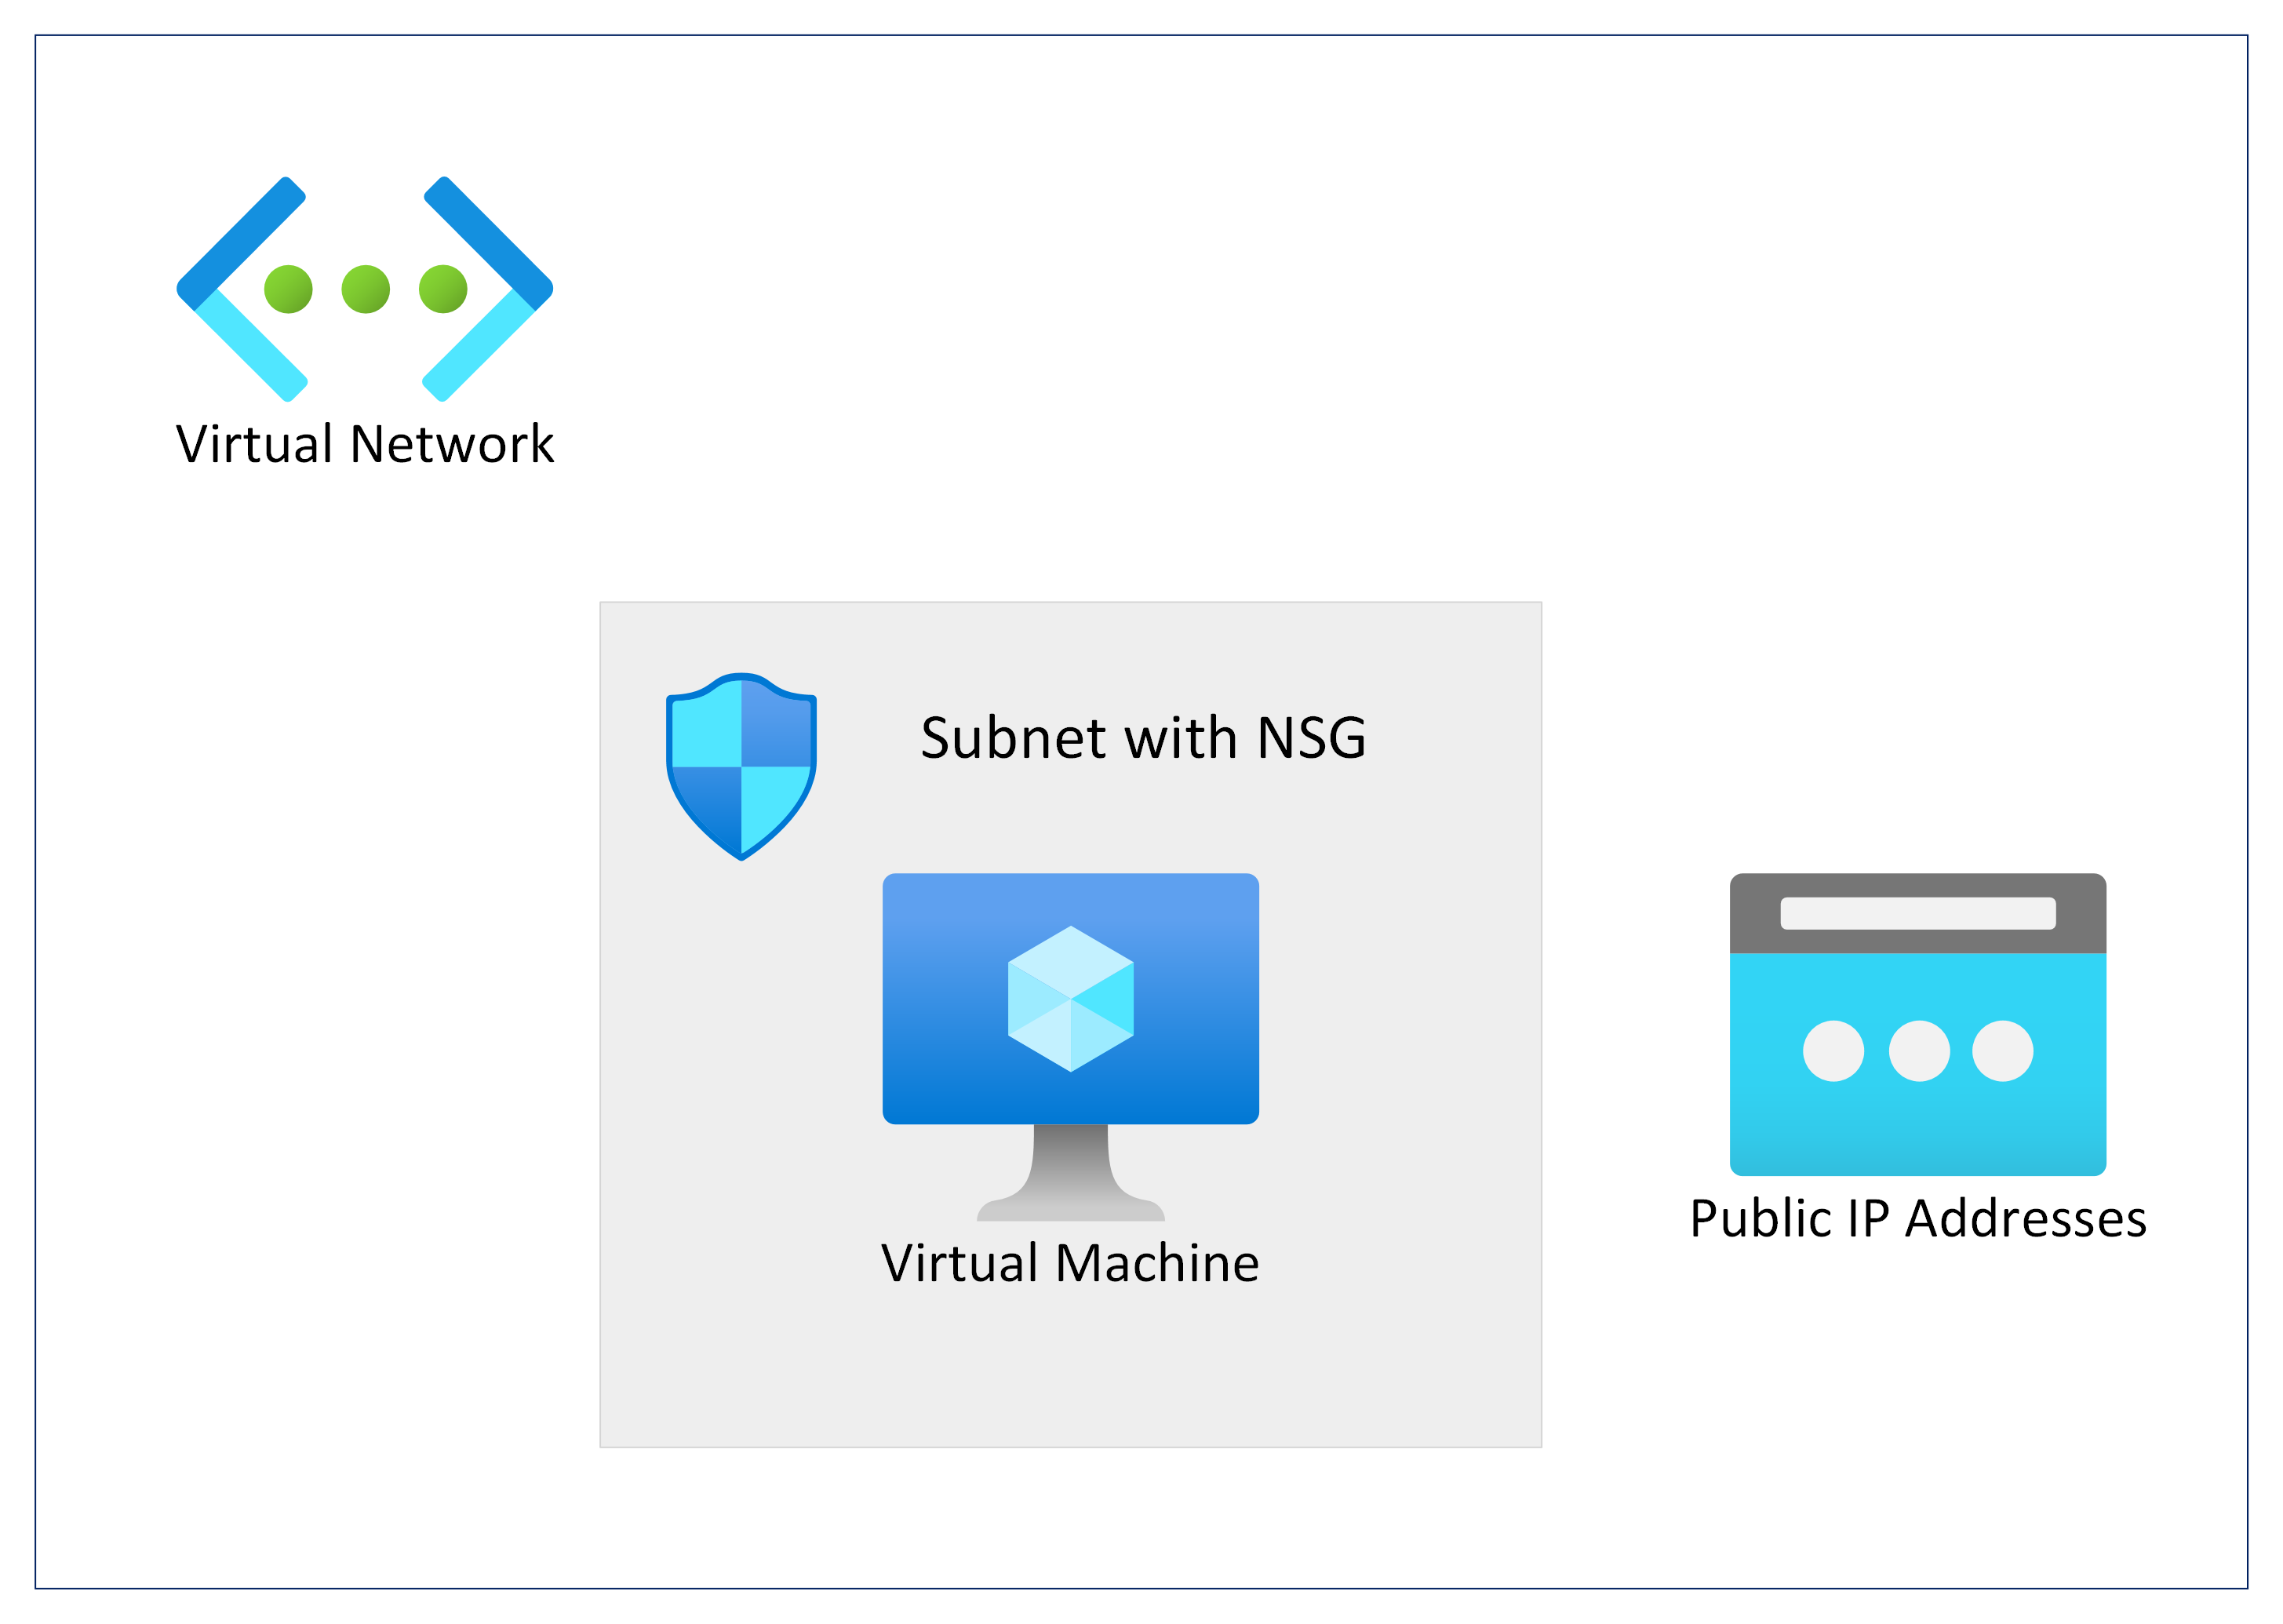
Network Architecture
We will deploy an Azure Virtual Machine with Ubuntu OS for configuring Nginx as web service.
Generate SSL certificate
Before we configure mTLS in Nginx, we need to issue SSL certificates and confgure web server for HTTPS.
We would create a self-signed SSL certificate using OpenSSL in this example but you should consider using SSL certificate from a valid well-known CA liek DigiCert or GoDaddy for production workloads.
sudo apt-get update
sudo apt-get install openssl
We will create a self-signed certificate chain with own custom root CA.
-
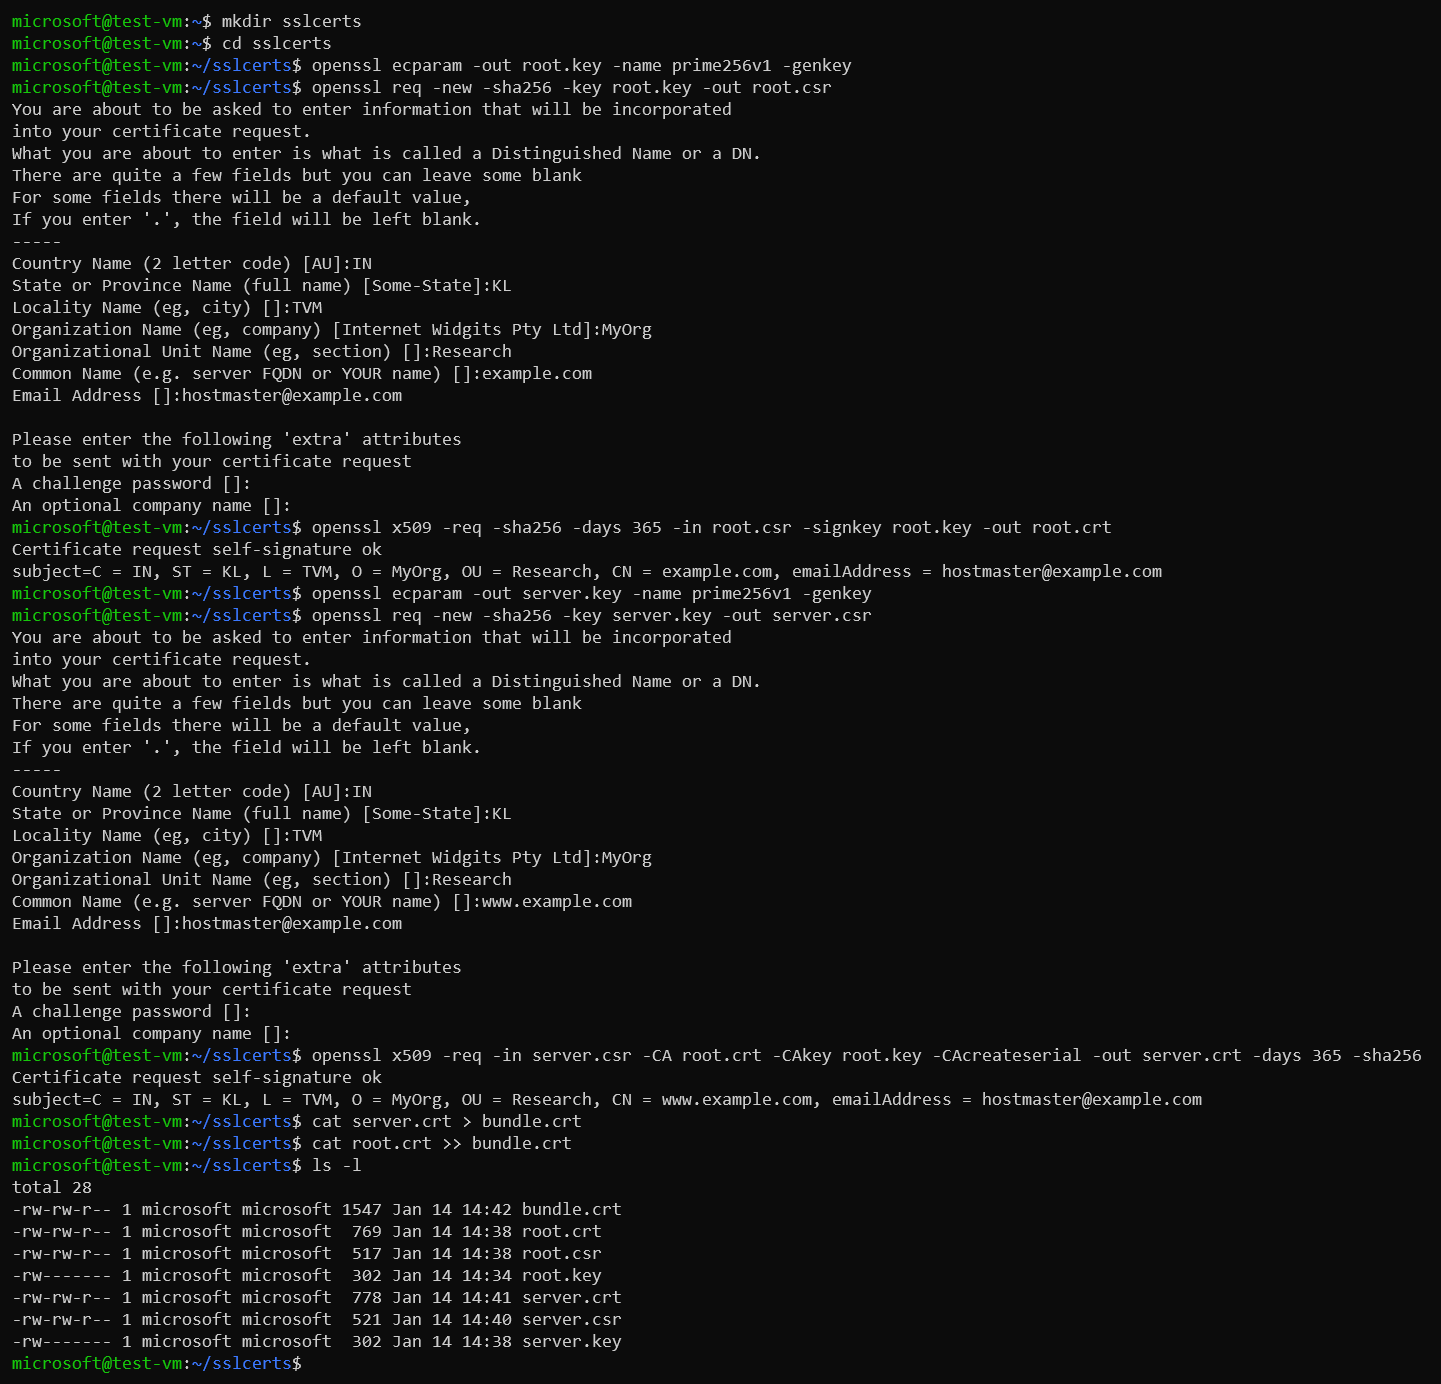
Create a key for root certificate
openssl ecparam -out root.key -name prime256v1 -genkey -
Create a CSR (Certificate Signing Request) for root certificate and self-sign it
Please note that the CN (Common Name) of the root certificate must be different from that of the server certificate. In this example, the CN for the issuer is
example.comand the server certificate’s CN iswww.example.com.openssl req -new -sha256 -key root.key -out root.csr -
Create the root certificate using the root CSR. We will use this to sign your server certificate.
openssl x509 -req -sha256 -days 365 -in root.csr -signkey root.key -out root.crt -
Generate the key for the server certificate.
openssl ecparam -out server.key -name prime256v1 -genkey -
Create the CSR for server certificate.
openssl req -new -sha256 -key server.key -out server.csr -
Create the server certificate signing it using root key
openssl x509 -req -in server.csr -CA root.crt -CAkey root.key -CAcreateserial -out server.crt -days 365 -sha256 -
Create a full chain certificate bundling root and server certificates.
cat server.crt > bundle.crt
cat root.crt >> bundle.crt
Example:
-
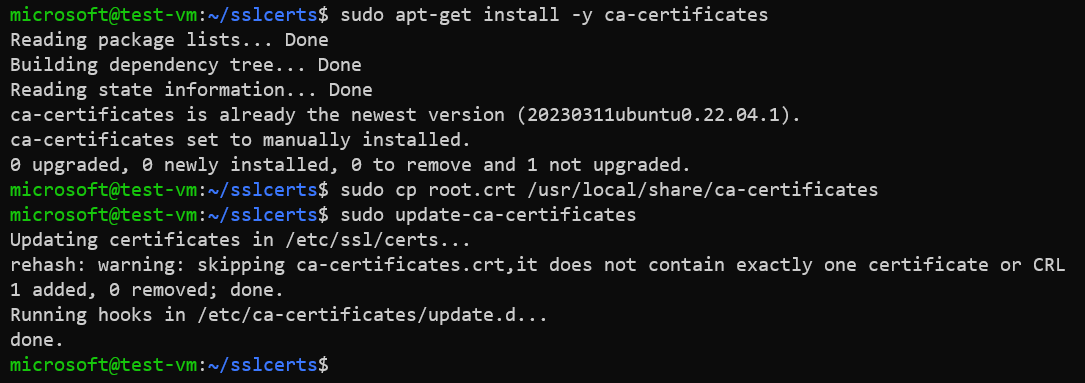
Install root certificate in the CA trust store of Ubuntu.
sudo apt-get install -y ca-certificates
sudo cp root.crt /usr/local/share/ca-certificates
sudo update-ca-certificates
Example:
Configure secure web service using Nginx
-
Install Nginx package.
sudo apt-get update sudo apt-get install nginx -
Create directory for custom website.
sudo mkdir /var/www/www.example.com -
Create a landing webpage.
sudo vi /var/www/www.example.com/index.htmlExample of the landing page.
<h1>Hello World!<h1> -
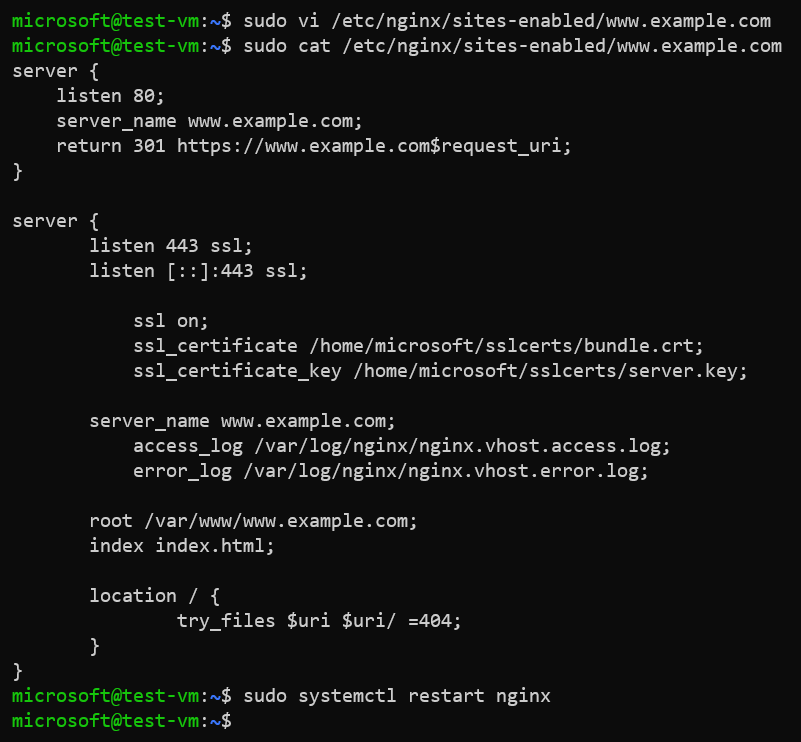
Create a virtual host file for your website.
sudo vi /etc/nginx/sites-enabled/www.example.comContents of virtual host file
/etc/nginx/sites-enabled/www.example.com.server { listen 443 ssl; listen [::]:443 ssl; ssl on; ssl_certificate /home/user/bundle.crt; ssl_certificate_key /home/user/server.key; server_name www.example.com; access_log /var/log/nginx/nginx.vhost.access.log; error_log /var/log/nginx/nginx.vhost.error.log; root /var/www/www.example.com; index index.html; location / { try_files $uri $uri/ =404; } } -
Restart Nginx service.
sudo systemctl restart nginxExample:
-
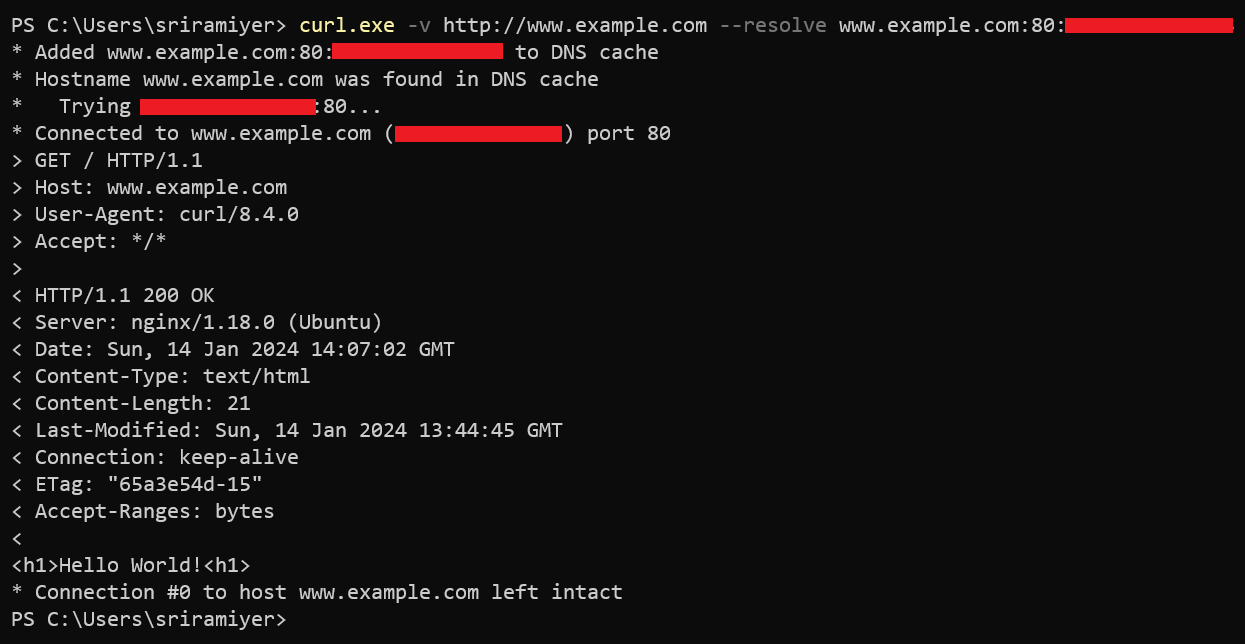
Verify accessing the web site.
curl -v http://www.example.com --resolve www.example.com:80:<Public IP of the VM>Example:
Create SSL certificate for client authentication
We must configure another SSL certificate Before configuring the client authentication. We could use the same bundle.crt file which we created before but using different certificate for client authentication is a best practice and security recommendation.
We can use the OpenSSL commands to create a self-signed client certificate as well.
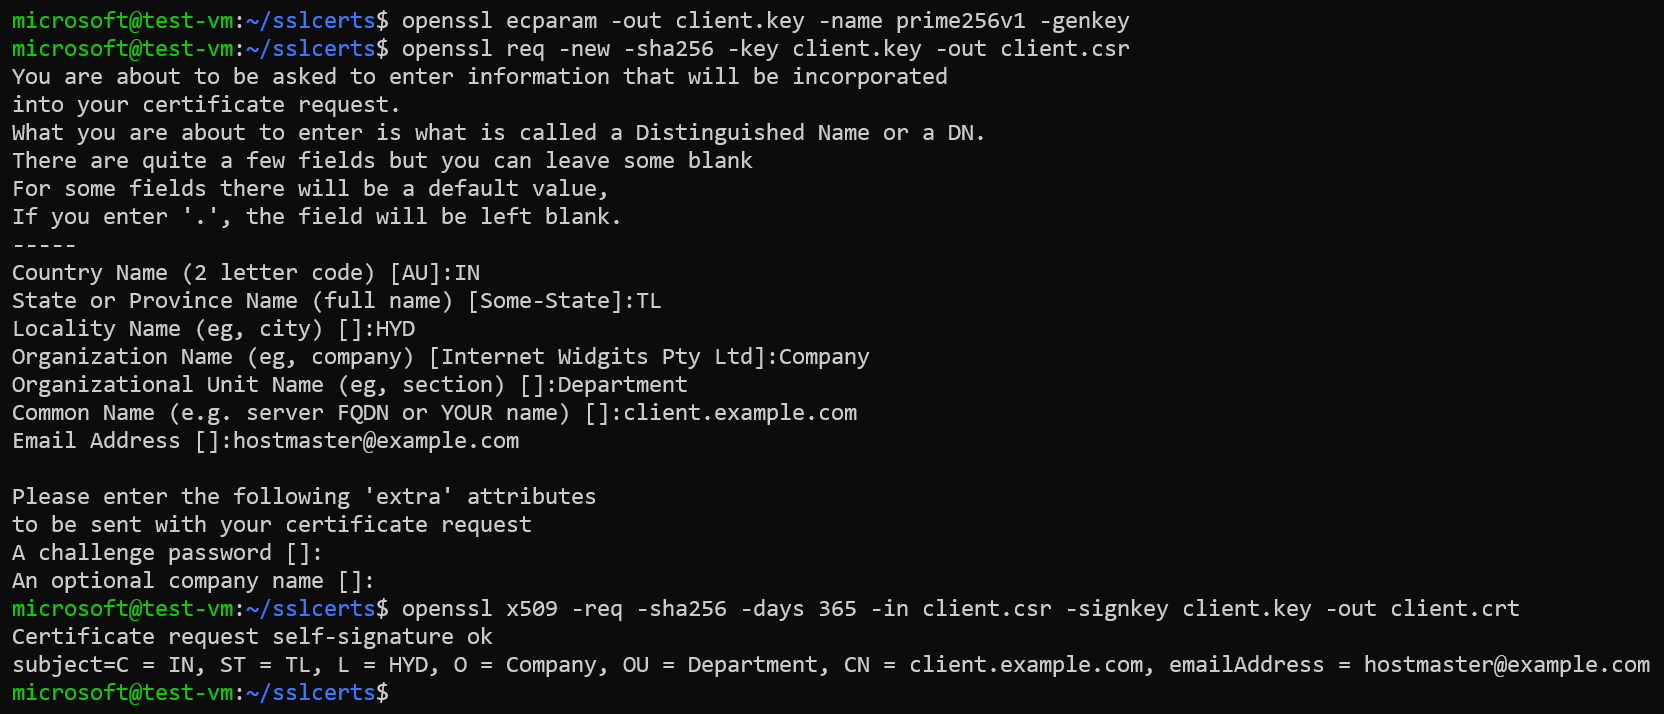
openssl ecparam -out client.key -name prime256v1 -genkey
openssl req -new -sha256 -key client.key -out client.csr
openssl x509 -req -sha256 -days 365 -in client.csr -signkey client.key -out client.crt
Example:
Configuring client authentication or mutual TLS in Nginx
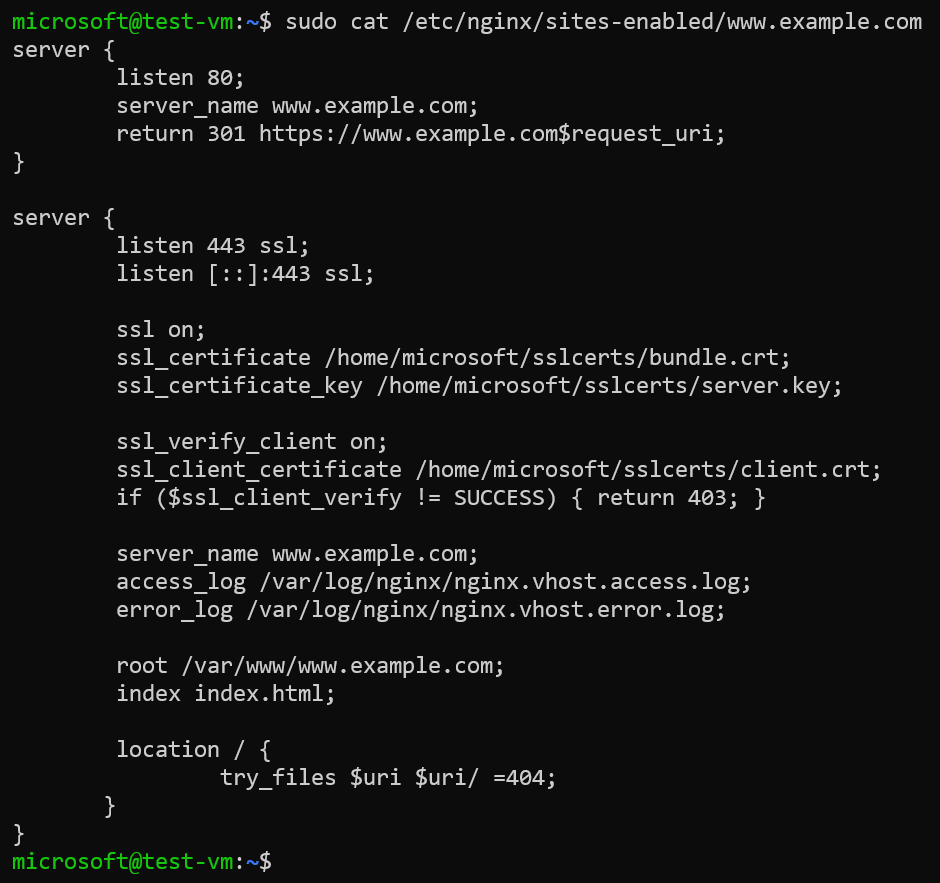
We enable the client authentication by setting the parameter ssl_verify_client to “on” and providing absolute path of the certificate (in PEM or CRT format) in the parameter “ssl_client_certificate”.
If a client does not pass the certificate then this this line of code if ($ssl_client_verify != SUCCESS) { return 403; } dictates the server to return a 403 (Forbidden) status code.
The virtual host file with configuration for client authentication is as below.
server {
        listen 80;
        server_name www.example.com;
        return 301 https://www.example.com$request_uri;
}

server {
        listen 443 ssl;
        listen [::]:443 ssl;

        ssl on;
        ssl_certificate /home/microsoft/sslcerts/bundle.crt;
        ssl_certificate_key /home/microsoft/sslcerts/server.key;

        ssl_verify_client on;
        ssl_client_certificate /home/microsoft/sslcerts/client.crt;
        if ($ssl_client_verify != SUCCESS) { return 403; }

        server_name www.example.com;
        access_log /var/log/nginx/nginx.vhost.access.log;
        error_log /var/log/nginx/nginx.vhost.error.log;

        root /var/www/www.example.com;
        index index.html;

        location / {
                try_files $uri $uri/ =404;
       }
}
Example:
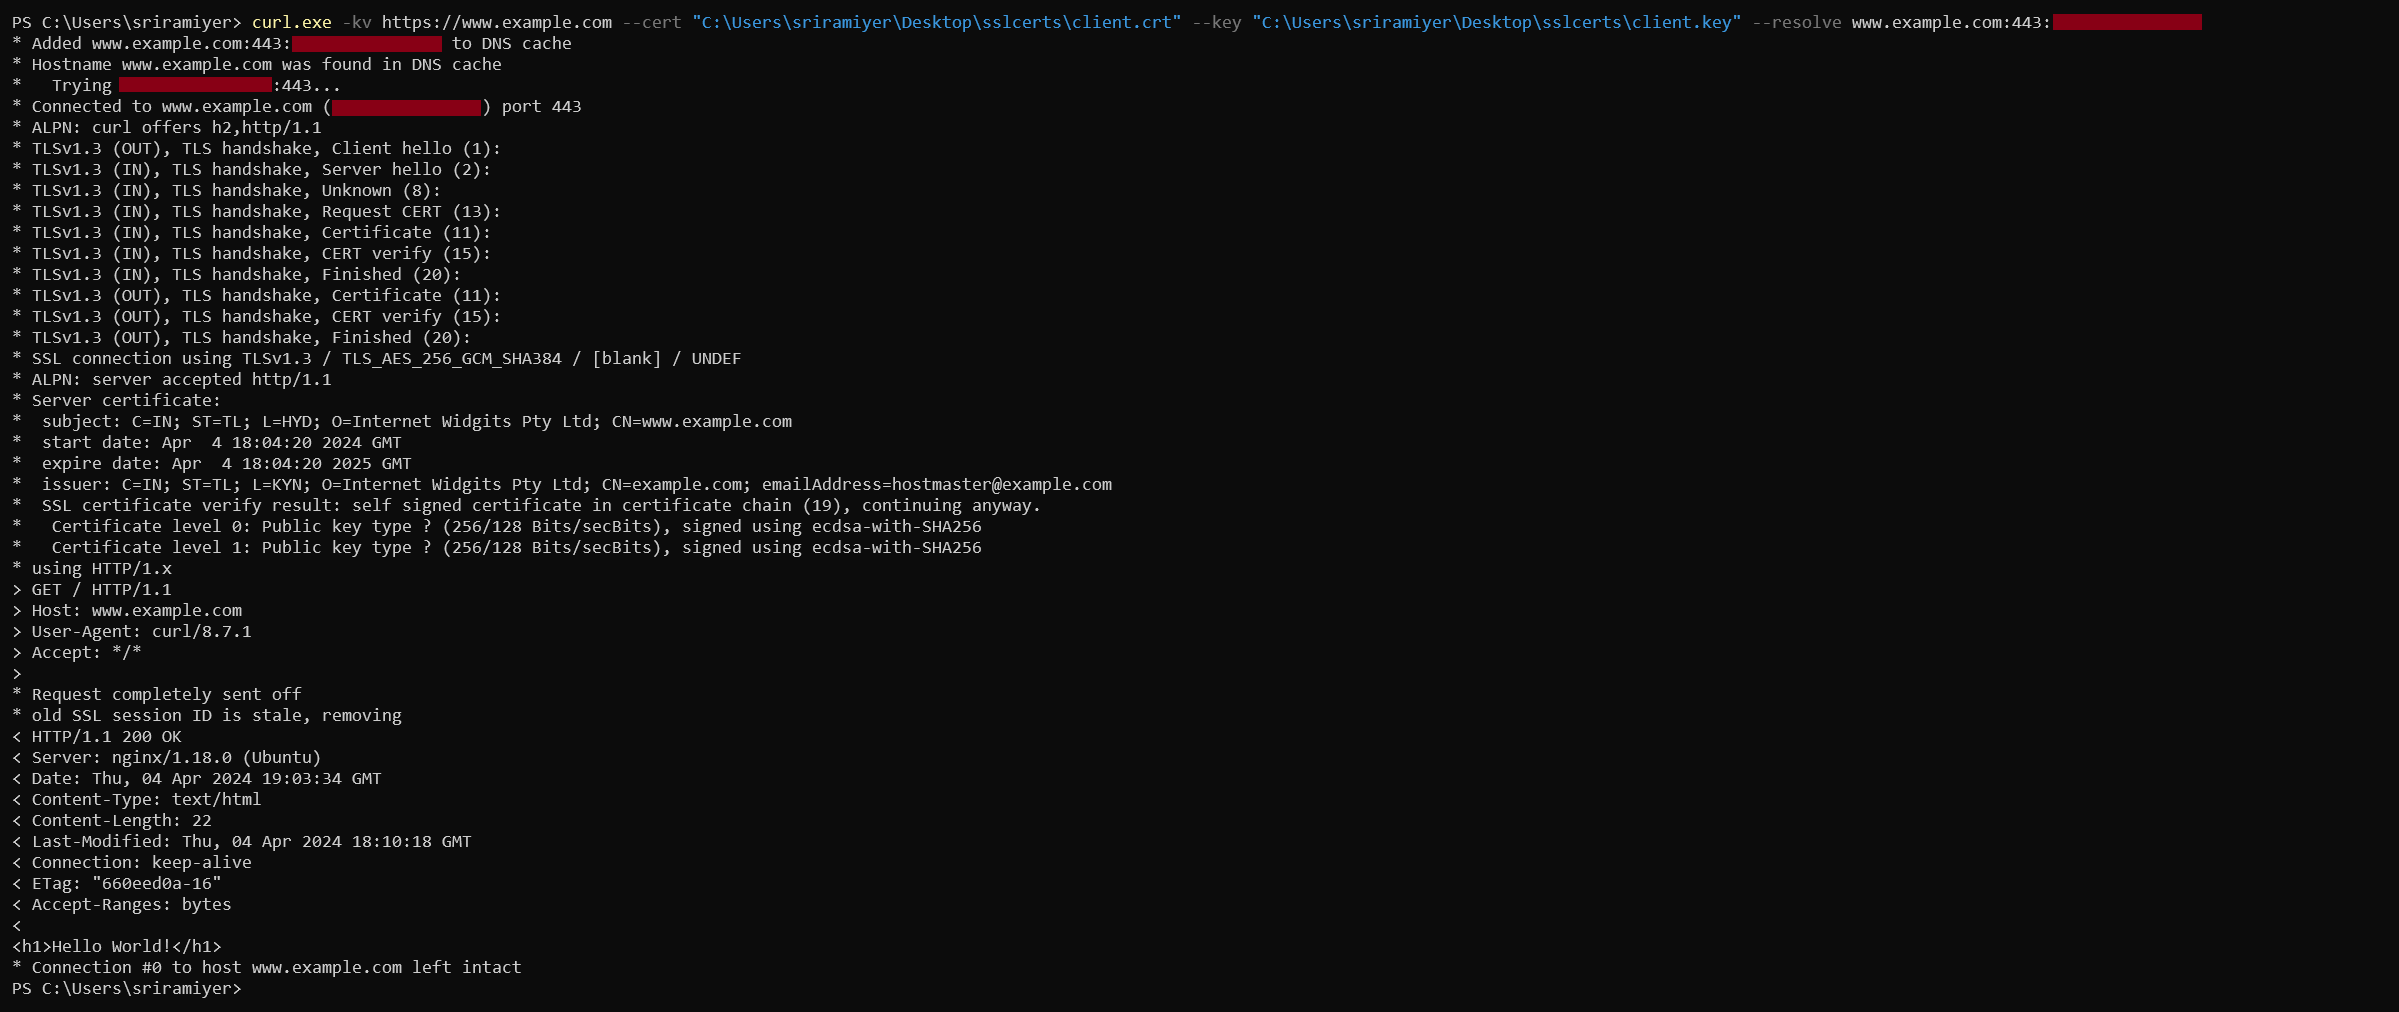
Verify accessing the Nginx
We will use the curl utility with options --cert and --key to send the client certificate and private key respectively. In the verbose output, we could see the Request CERT message indicating request from server for verifying client’s certificate.